Preventing unauthorized access to Web API controller actions and applying a centralized security access, seems to be a tough and complicated task for many web developers. More over, there are many players entered into the game latetly, such as ASP.NET Identity or OWIN middleware and things can get pretty messed up if any of these concepts are not well understood.
This is the last part of the 3 Part Series about integrating Web API and AngularJS. What we have seen till now on the first and second post, is how to setup an MVC web application project work with AngularJS as the front-end and a Web API layer as the service layer. Second post’s objective was enabling Session State in to the Web API layer so that users don’t loose cart’s data at page refreshes. What we left undone though, is securing our application from unauthorized access which in our case that would be preventing unathenticated users from creating gadget orders. I ‘ll start adding new functionality to the GadgetStore project so in case you want to follow with me, you can download it from here. Let’s start!
I will break the Security integration into the following 3 parts starting from bottom to top.
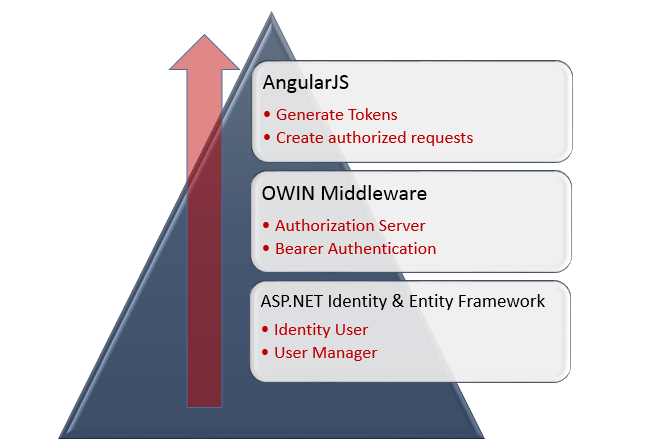
ASP.NET Identity & Entity Framework
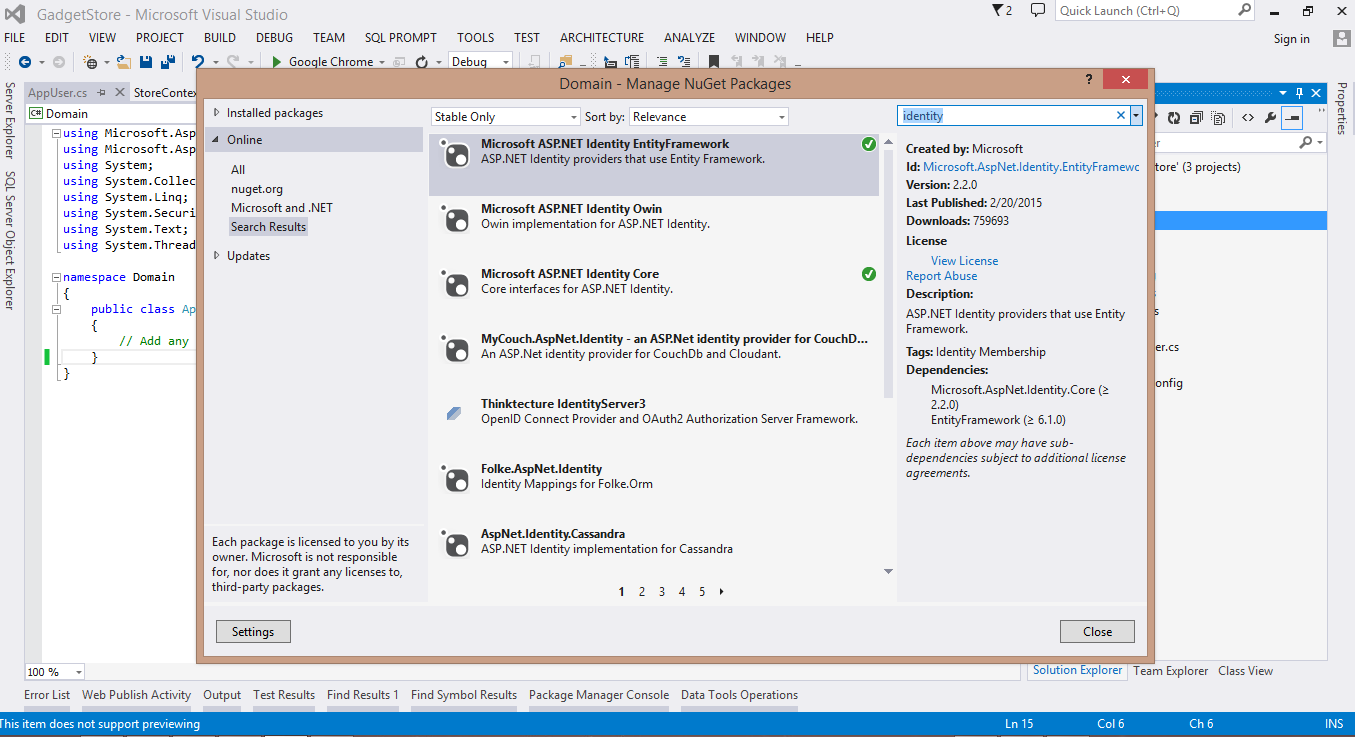
In our GadgetStore application we do use Entity Framework for database access but we don’t have any membership related Entities yet. In order to make Entity Framework act as the storage system of ASP.NET Identity we need to make use of two specific classes: IdentityUser and UserManager. Then we ‘ll change our StoreContext to inherit IdentityDbContext<IdentityUser> instead of simple DbContext. Mind that you don’t have to use the exact implementations of IdentityUser and UserManager as are, but you can create your own classes that derive from these two respectively. This is actually what we are gonna do right now. Starting from the Domain class library project install Microsoft ASP.NET Identity EntityFramework package using Nuget Packages. This will also install Microsoft ASP.NET Identity Core as follow.
Add an AppStoreUser class file and paste the following code.
AppStoreUser.cs
public class AppStoreUser : IdentityUser
{
// Add any custom properties you wish here
}
You can add any custom properties if you want, such as DateCreated, DateUpdated, etc. The default IdentityUser implementation has the following properties:
- ID: User’s unique id
- Email: User’s email address
- Claims: User’s claims collection
- Logins: User’s logins
- PasswordHash: User’s password hashed
- Roles: The roles that the user belongs to
- Phonenumber: User’s phone number
- SecurityStamp: A value that changes when user’s identity is altered
- Username: User’s username
Now switch to DataAccess class library project and install ASP.NET Identity Entity Framework package as well. UserIdentity class may have a special meaning for Entity Framework but that doesn’t mean it cannot have it’s own configuration. If you remember, we had a folder named Configurations inside this project, where we put all our Entity Framework Configurations. Let’s make the same for the previous class we added. Add a class named AppStoreUserConfiguration inside the configurations folder.
public class AppStoreUserConfiguration : EntityTypeConfiguration<AppStoreUser>
{
public AppStoreUserConfiguration()
{
ToTable("Users");
}
}
Generally, when Entity Framework tries to create User related entities in Database, it will also create the required membership schema. Those tables will be named IdentityUsers, IdentityUserClaims, etc.. In order to modify the table name definition for the IdentityUsers we created the above class. While at the same project open StoreContext.cs file and alter it as follow:
StoreContext.cs
public class StoreContext : IdentityDbContext<AppStoreUser>
{
public StoreContext()
: base("StoreContext", throwIfV1Schema: false) { }
protected override void OnModelCreating(DbModelBuilder modelBuilder)
{
modelBuilder.Entity<IdentityUserLogin>().HasKey<string>(l => l.UserId);
modelBuilder.Entity<IdentityRole>().HasKey<string>(r => r.Id);
modelBuilder.Entity<IdentityUserRole>().HasKey(r => new { r.RoleId, r.UserId });
modelBuilder.Configurations.Add(new AppStoreUserConfiguration());
modelBuilder.Configurations.Add(new CategoryConfiguration());
modelBuilder.Configurations.Add(new OrderConfiguration());
}
public DbSet<Gadget> Gadgets { get; set; }
public DbSet<Category> Categories { get; set; }
public DbSet<Order> Orders { get; set; }
public DbSet<GadgetOrder> GadgetOrders { get; set; }
public static StoreContext Create()
{
return new StoreContext();
}
}
The most important change to notice is that StoreContext class inherits IdentityDbContext and not DbContext anymore. Now let’s create the class that will inherit UserManager<T> where T is a UserIdentity class. We will place this class inside the Infrastructure folder in the Web project named Store. This means that you have to install ASP.NET Identity EntityFramework package in this project as well.
AppStoreUserManager.cs
public class AppStoreUserManager : UserManager<AppStoreUser>
{
public AppStoreUserManager(IUserStore<AppStoreUser> store)
: base(store)
{
}
}
This class can be used to manage AppStoreUser instances, that is create, modify or even delete user entities. It isn’t though limited only to Entity Framework operations as will we ‘ll see later on this post.
OWIN Middleware
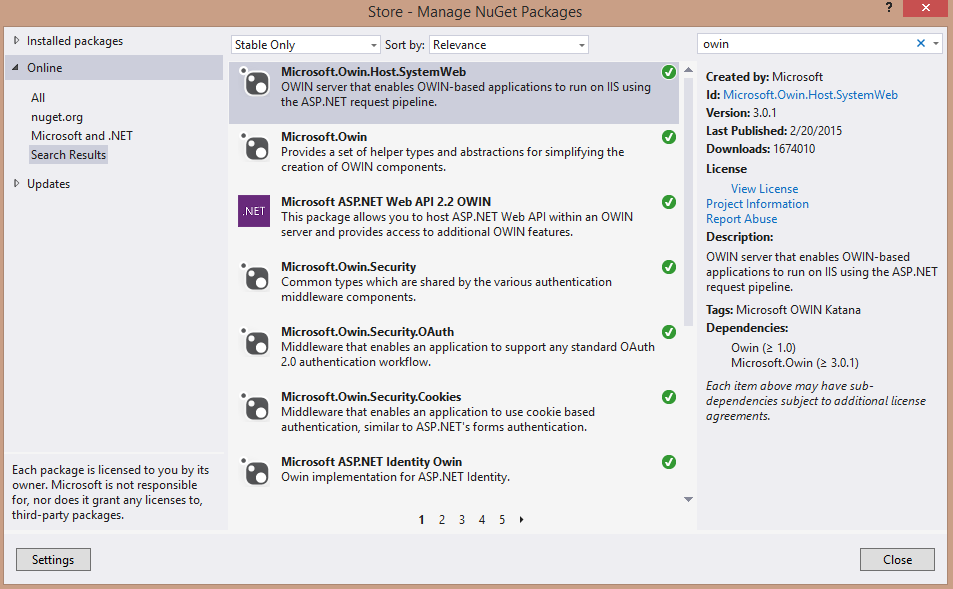
It’s time to setup an OWIN OAth2 Authorization Server in our application. Before starting adding the required components make sure you have the following Nuget Packages installed:
- Microsoft.Owin.Host.SystemWeb
- Microsoft.Owin
- Microsoft ASP.NET Web API 2.2 OWIN
- Microsoft.Owin.Security
- Microsoft.Owin.Security.OAth
- Microsoft.Owin.Security.Cookies (optional)
- Microsoft ASP.NET Identity Owin
- OWIN
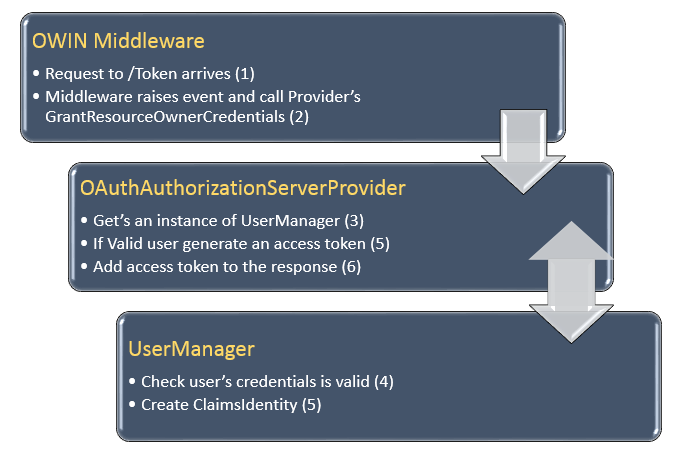
If I were to describe what OWIN Middleware is, I would say that middleware is a black box of specific services that an application requires. In other words, you setup an OWIN middleware by selecting individual services you want to use and the specific provider for those services. In our case, we will use OWIN to enable Bearer Token Authentication in our application. The key point to understand here, is that OWIN raises it’s own events when a request arrives. When those events are raised, all respective providers will also respond respectively. Is the Store applicaton we will plug an OAuthAuthorizationServerProvider which will be called from OWIN middleware everytime a user tries to create an access token. Assuming you have all the prementioned packages installed, add a Startup.cs file at the root of the Store application.
using Microsoft.Owin;
using Owin;
using System;
using System.Collections.Generic;
using System.Linq;
using System.Web;
[assembly: OwinStartup(typeof(Store.Startup))]
namespace Store
{
public partial class Startup
{
public void Configuration(IAppBuilder app)
{
ConfigureStoreAuthentication(app);
}
}
}
In the App_Start folder add another file named Startup.cs.
App_Start/Startup.cs
using DataAccess;
using Microsoft.Owin;
using Microsoft.Owin.Security.OAuth;
using Microsoft.AspNet.Identity;
using Microsoft.AspNet.Identity.EntityFramework;
using Owin;
using System;
using System.Collections.Generic;
using System.Linq;
using System.Web;
using Store.Infrastructure;
namespace Store
{
public partial class Startup
{
public static OAuthAuthorizationServerOptions OAuthOptions { get; private set; }
public static string PublicClientId { get; private set; }
public void ConfigureStoreAuthentication(IAppBuilder app)
{
// User a single instance of StoreContext and AppStoreUserManager per request
app.CreatePerOwinContext(StoreContext.Create);
app.CreatePerOwinContext<AppStoreUserManager>(AppStoreUserManager.Create);
// Configure the application for OAuth based flow
PublicClientId = "self";
OAuthOptions = new OAuthAuthorizationServerOptions
{
TokenEndpointPath = new PathString("/Token"),
Provider = new ApplicationOAuthProvider(PublicClientId),
AccessTokenExpireTimeSpan = TimeSpan.FromDays(10),
AllowInsecureHttp = true
};
app.UseOAuthBearerTokens(OAuthOptions);
}
}
}
We want our application to use Bearer Token Authentication so we set a relative provider (not implemented yet). Anyone wants to create an access token will have to post it’s credentials on /Token URI. Let’s continue by adding two required methods into the AppStoreUserManager class.
AppStoreUserManager.cs
using DataAccess;
using Domain;
using Microsoft.AspNet.Identity;
using Microsoft.AspNet.Identity.EntityFramework;
using Microsoft.AspNet.Identity.Owin;
using Microsoft.Owin;
using System;
using System.Collections.Generic;
using System.Linq;
using System.Security.Claims;
using System.Threading.Tasks;
using System.Web;
namespace Store.Infrastructure
{
public class AppStoreUserManager : UserManager<AppStoreUser>
{
public AppStoreUserManager(IUserStore<AppStoreUser> store)
: base(store)
{
}
public static AppStoreUserManager Create(IdentityFactoryOptions<AppStoreUserManager> options, IOwinContext context)
{
var manager = new AppStoreUserManager(new UserStore<AppStoreUser>(context.Get<StoreContext>()));
// Configure validation logic for usernames
manager.UserValidator = new UserValidator<AppStoreUser>(manager)
{
AllowOnlyAlphanumericUserNames = false,
RequireUniqueEmail = true
};
// Password Validations
manager.PasswordValidator = new PasswordValidator
{
RequiredLength = 6,
RequireNonLetterOrDigit = false,
RequireDigit = false,
RequireLowercase = true,
RequireUppercase = true,
};
var dataProtectionProvider = options.DataProtectionProvider;
if (dataProtectionProvider != null)
{
manager.UserTokenProvider = new DataProtectorTokenProvider<AppStoreUser>(dataProtectionProvider.Create("ASP.NET Identity"));
}
return manager;
}
public async Task<ClaimsIdentity> GenerateUserIdentityAsync(AppStoreUser user, string authenticationType)
{
var userIdentity = await CreateIdentityAsync(user, authenticationType);
return userIdentity;
}
}
}
When OWIN requires an instance of a AppStoreUserManager it will call the create method. Inside a Web API Controller this will be done like this:
Request.GetOwinContext().GetUserManager<AppStoreUserManager>();
OAuthAuthorizationServerProvider
We need to add an implementation class of the OAuthAuthorizationServerProvider which will be used to grand access to Web API resources (Action methods). Inside the infrastructure folder add the following ApplicationOAuthProvider class.
using Domain;
using Microsoft.Owin.Security;
using Microsoft.Owin.Security.Cookies;
using Microsoft.Owin.Security.OAuth;
using Microsoft.AspNet.Identity.Owin;
using System;
using System.Collections.Generic;
using System.Linq;
using System.Security.Claims;
using System.Threading.Tasks;
using System.Web;
namespace Store.Infrastructure
{
public class ApplicationOAuthProvider : OAuthAuthorizationServerProvider
{
private readonly string _publicClientId;
public ApplicationOAuthProvider(string publicClientId)
{
if (publicClientId == null)
{
throw new ArgumentNullException("publicClientId");
}
_publicClientId = publicClientId;
}
public override async Task GrantResourceOwnerCredentials(OAuthGrantResourceOwnerCredentialsContext context)
{
var userManager = context.OwinContext.GetUserManager<AppStoreUserManager>();
AppStoreUser user = await userManager.FindAsync(context.UserName, context.Password);
if (user == null)
{
context.SetError("invalid_grant", "Invalid username or password.");
return;
}
ClaimsIdentity oAuthIdentity = await userManager.GenerateUserIdentityAsync(user, OAuthDefaults.AuthenticationType);
AuthenticationProperties properties = new AuthenticationProperties();
AuthenticationTicket ticket = new AuthenticationTicket(oAuthIdentity, properties);
context.Validated(ticket);
}
public override Task ValidateClientAuthentication(OAuthValidateClientAuthenticationContext context)
{
if (context.ClientId == null)
{
context.Validated();
}
return Task.FromResult<object>(null);
}
}
}
When a user tries to login, he ‘ll post his credentials to /Token URI (not to some Login action). OWIN middleware will raise an event and will call GrantResourceOwnerCredentials of the provider. If the credentials are valid then an access token will be created and added to the response. All requests trying to access a protected resource, must provide this generated access token. You can now understand that the provider is the glue between the OWIN Middleware and ASP.NET Identity.
One last but not least thing to do which is also related to setting up the security logic, is to inform Web API that we want to use only Bearer token authentication. If you miss that part nothing will work as expected. Open WebApiConfig class and modify as follow:
public static class WebApiConfig
{
public static void Register(HttpConfiguration config)
{
// Web API configuration and services
// Configure Web API to use only bearer token authentication.
config.SuppressDefaultHostAuthentication();
config.Filters.Add(new HostAuthenticationFilter(OAuthDefaults.AuthenticationType));
// Web API routes
config.MapHttpAttributeRoutes();
}
}
The HostAuthenticationFilter is responsible to authenticate users based on the access token found inside the request. If no token found then the user is considered as unauthenticated and cannot access protected resources.
Before moving to the AngularJS Level, let’s restrict access to the OrdersController Web API Controller by adding an Authorize at the class level.
AccountController.cs
[Authorize]
public class OrdersController : ApiController
{
We will need an AccountController that users can use to register new accounts. Add it inside the Controllers folder.
[Authorize]
[RoutePrefix("api/Account")]
public class AccountController : ApiController
{
//private const string LocalLoginProvider = "Local";
private AppStoreUserManager _userManager;
public AccountController()
{
}
public AccountController(AppStoreUserManager userManager,
ISecureDataFormat<AuthenticationTicket> accessTokenFormat)
{
UserManager = userManager;
AccessTokenFormat = accessTokenFormat;
}
public AppStoreUserManager UserManager
{
get
{
return _userManager ?? Request.GetOwinContext().GetUserManager<AppStoreUserManager>();
}
private set
{
_userManager = value;
}
}
public ISecureDataFormat<AuthenticationTicket> AccessTokenFormat { get; private set; }
// POST api/Account/Register
[AllowAnonymous]
[Route("Register")]
public async Task<IHttpActionResult> Register(RegistrationModel model)
{
if (!ModelState.IsValid)
{
return BadRequest(ModelState);
}
var user = new AppStoreUser() { UserName = model.Email, Email = model.Email };
IdentityResult result = await UserManager.CreateAsync(user, model.Password);
if (!result.Succeeded)
{
return GetErrorResult(result);
}
return Ok();
}
protected override void Dispose(bool disposing)
{
if (disposing && _userManager != null)
{
_userManager.Dispose();
_userManager = null;
}
base.Dispose(disposing);
}
#region Helpers
private IAuthenticationManager Authentication
{
get { return Request.GetOwinContext().Authentication; }
}
private IHttpActionResult GetErrorResult(IdentityResult result)
{
if (result == null)
{
return InternalServerError();
}
if (!result.Succeeded)
{
if (result.Errors != null)
{
foreach (string error in result.Errors)
{
ModelState.AddModelError("", error);
}
}
if (ModelState.IsValid)
{
// No ModelState errors are available to send, so just return an empty BadRequest.
return BadRequest();
}
return BadRequest(ModelState);
}
return null;
}
#endregion
}
AngularJS
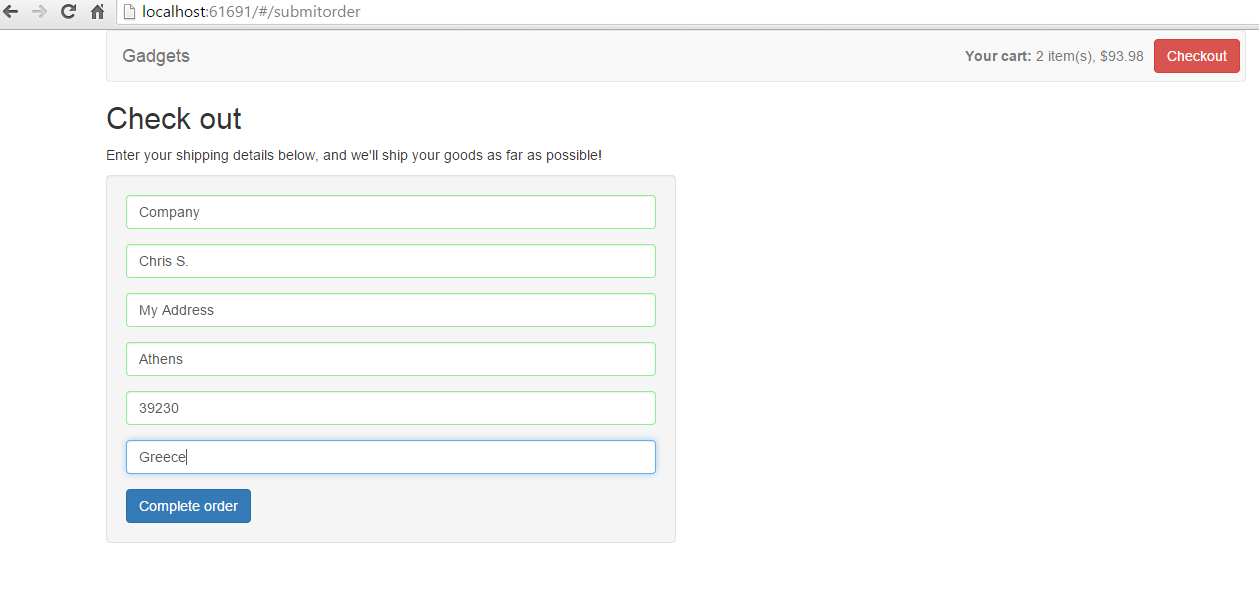
Things in this level will be much more easier to understand, I assure you. Let me remind you the interface where the user used to create gadget orders:
If you run your application and try to create an order, you will get an unauthorized error since we restricted the access to the orders controller. We need to change two things in the angularjs $scope.sendOrder functions, which resides inside the gadgetsStore.js file. Let me also remind you that this file also defines the root controller gadgetsStoreCtrl of our AngularJS application.
Part of gadgetsStore.js
$scope.sendOrder = function (shippingDetails) {
var token = sessionStorage.getItem(tokenKey);
console.log(token);
var headers = {};
if (token) {
headers.Authorization = 'Bearer ' + token;
}
var order = angular.copy(shippingDetails);
order.gadgets = cart.getProducts();
$http.post(ordersUrl, order, { headers: { 'Authorization': 'Bearer ' + token } })
.success(function (data, status, headers, config) {
$scope.data.OrderLocation = headers('Location');
$scope.data.OrderID = data.OrderID;
cart.getProducts().length = 0;
$scope.saveOrder();
$location.path("/complete");
})
.error(function (data, status, headers, config) {
if (status != 401)
$scope.data.orderError = data.Message;
else {
$location.path("/login");
}
}).finally(function () {
});
}
This is how we send a Bearer Authorization header in AngularJS. At this point we haven’t written any code that stores the token into the sessionStorage but at least we will be directed to another location. In this method we used tokenKey and tokenUrl constants so make sure you add them at the beggining of the same file as follow:
Part of gadgetsStore.js
angular.module('gadgetsStore')
.constant('gadgetsUrl', 'http://localhost:61691/api/gadgets')
.constant('ordersUrl', 'http://localhost:61691/api/orders')
.constant('categoriesUrl', 'http://localhost:61691/api/categories')
.constant('tempOrdersUrl', 'http://localhost:61691/api/sessions/temporders')
.constant('registerUrl', '/api/Account/Register')
.constant('tokenUrl', '/Token')
.constant('tokenKey', 'accessToken')
.controller('gadgetStoreCtrl', function ($scope, $http, $location, gadgetsUrl, categoriesUrl, ordersUrl, tempOrdersUrl, cart, tokenKey) {
At the same file we need two more methods: A $scope.logout function which simply removes the access token and hence the user get unauthenticated and the $scope.createAccount which redirects the user to a register template.
$scope.logout = function () {
sessionStorage.removeItem(tokenKey);
}
$scope.createAccount = function () {
$location.path("/register");
}
Redirection to /login and /register locations won’t do anything if we don’t tell so. In the mainApp.js file add the highlighted lines.
mainApp.js
angular.module("gadgetsStore", ["storeFilters", "storeCart", "ngRoute", "chieffancypants.loadingBar","ngAnimate"])
.config(function ($routeProvider) {
$routeProvider.when("/gadgets", {
templateUrl: "app/views/gadgets.html"
});
$routeProvider.when("/checkout", {
templateUrl: "app/views/checkout.html"
});
$routeProvider.when("/submitorder", {
templateUrl: "app/views/submitOrder.html"
});
$routeProvider.when("/complete", {
templateUrl: "app/views/orderSubmitted.html"
});
$routeProvider.when("/login", {
templateUrl: "app/views/login.html"
});
$routeProvider.when("/register", {
templateUrl: "app/views/register.html"
});
$routeProvider.otherwise({
templateUrl: "app/views/gadgets.html"
});
});
We certainly need to create the login.html and register.html template views but first, let’s create the accountController that both of them will make use of. Add the following javascript file inside the app/controllers foldler.
angular.module("gadgetsStore")
.controller('accountController', function ($scope, $http, $location, registerUrl, tokenUrl, tokenKey) {
$scope.hasLoginError = false;
$scope.hasRegistrationError = false;
// Registration
$scope.register = function () {
$scope.hasRegistrationError = false;
$scope.result = '';
var data = {
Email: $scope.registerEmail,
Password: $scope.registerPassword,
ConfirmPassword: $scope.registerPassword2
};
$http.post(registerUrl, JSON.stringify(data))
.success(function (data, status, headers, config) {
$location.path("/login");
}).error(function (data, status, headers, config) {
$scope.hasRegistrationError = true;
var errorMessage = data.Message;
console.log(data);
$scope.registrationErrorDescription = errorMessage;
if (data.ModelState['model.Email'])
$scope.registrationErrorDescription += data.ModelState['model.Email'];
if (data.ModelState['model.Password'])
$scope.registrationErrorDescription += data.ModelState['model.Password'];
if (data.ModelState['model.ConfirmPassword'])
$scope.registrationErrorDescription += data.ModelState['model.ConfirmPassword'];
if (data.ModelState[''])
$scope.registrationErrorDescription += data.ModelState[''];
}).finally(function () {
});
}
$scope.login = function () {
$scope.result = '';
var loginData = {
grant_type: 'password',
username: $scope.loginEmail,
password: $scope.loginPassword
};
$http({
method: 'POST',
url: tokenUrl,
data: $.param(loginData),
headers: {
'Content-Type': 'application/x-www-form-urlencoded; charset=UTF-8'
}
}).then(function (result) {
console.log(result);
$location.path("/submitorder");
sessionStorage.setItem(tokenKey, result.data.access_token);
$scope.hasLoginError = false;
$scope.isAuthenticated = true;
}, function (data, status, headers, config) {
$scope.hasLoginError = true;
$scope.loginErrorDescription = data.data.error_description;
});
}
});
I have highlighted only the login method cause it’s the most important. Notice that login method posts user’s credentials to the token Uri. Also notice the type of the Content-Type and the jQuery convertion we applied to the data, in order to serialize the object and make it suitable for use for this type of request. Omit either the data convertion or the Content-Type and nothing will work. We haven’t used jQuery at all till now so make sure you add a reference into the Index.cshtml page as follow (change if you have different version):
Part of Index.cshtml
<script src="../../Scripts/angular.js" type="text/javascript"></script>
<script src="../../Scripts/angular-route.js" type="text/javascript"></script>
<script src="~/Scripts/angular-animate.js"></script>
<script src="~/Scripts/jquery-1.9.0.js"></script>
<script src="~/Scripts/loading-bar.js"></script>
<script src="~/app/mainApp.js"></script>
<script src="../../app/controllers/gadgetsStore.js" type="text/javascript"></script>
<script src="../../app/filters/storeFilters.js" type="text/javascript"></script>
<script src="../../app/controllers/gadgetsControllers.js" type="text/javascript"></script>
<script src="../../app/components/cartCmp.js" type="text/javascript"></script>
<script src="../../app/controllers/checkoutController.js" type="text/javascript"></script>
<script src="~/app/controllers/accountController.js"></script>
Following are the login.html and register.html template views.
app/views/login.html
<div class="container" style="margin-top:30px" ng-controller="accountController">
<div class="col-md-12">
<div class="modal-dialog" style="margin-bottom:0">
<div class="modal-content">
<div class="panel-heading">
<h3 class="panel-title">Sign In</h3>
</div>
<div class="panel-body">
<form role="form">
<fieldset>
<div class="form-group">
<input class="form-control" placeholder="E-mail" name="email" type="email" ng-model="loginEmail" autofocus="">
</div>
<div class="form-group">
<input class="form-control" placeholder="Password" name="password" type="password" ng-model="loginPassword" value="">
</div>
<div class="alert alert-warning" ng-show="hasLoginError">
</div>
Login
Create account
</fieldset>
</form>
</div>
</div>
</div>
</div>
</div>
app/views/register.html
<div class="container" style="margin-top:30px" ng-controller="accountController">
<div class="col-md-12">
<div class="modal-dialog" style="margin-bottom:0">
<div class="modal-content">
<div class="panel-heading">
<h3 class="panel-title">Registration Form</h3>
</div>
<div class="panel-body">
<form role="form">
<fieldset>
<div class="form-group">
<input class="form-control" placeholder="E-mail" name="email" type="email" ng-model="registerEmail" autofocus="">
</div>
<div class="form-group">
<input class="form-control" placeholder="Password" name="password" type="password" ng-model="registerPassword" value="">
</div>
<div class="form-group">
<input class="form-control" placeholder="Confirm Password" name="confirmPassword" type="password" ng-model="registerPassword2" value="">
</div>
<div class="alert alert-warning" ng-show="hasRegistrationError">
</div>
Create account
</fieldset>
</form>
</div>
</div>
</div>
</div>
</div>
Open the cartDetails.html and add the highlighted line so that user can logout when is already signed in.
<style>
.navbar-right {
float: right !important;
margin-right: 5px;
}
.navbar-text {
margin-right: 10px;
}
</style>
<div class="navbar-right">
<div class="navbar-text">
<b>Your cart:</b> {{itemCount()}} item(s), {{total() | currency}}
</div>
Checkout
Logout
</div>
Build and run your application. Try to create an order and you will be redirected to the login page. Click the register button to and reate an account. You will be redirected to login page. Enter your credentials and continue with your order. You can create orders till you press the logout button.
Click here to see it in action (you may required to refresh the page when the tab opens).
Conclusion
I am really happy that these Web API feat. AngularJS series have come to an end cause we had the opportunity to see a lot of features concerning both Web API and AngularJS. Now that we have a project like this, we can focus more on individual concepts such as Web API Security or AngularJS project structure best practices. There are so many things we added this time and I hope I have mentioned all of these in the post. If you have problems running your application you can always download the tested and updated version from here. Make sure you get subscribed and get notified for newer posts!
AngularJS Source Code updated
I have slightly updated AngularJS code as far as concerned the Ajax calls to Web API actions. In the github project, you will notice that I moved all the Ajax calls to two new AngularJS services, accountService and storeService. So, here’s for example the accountService:
app/services/accountService.js
angular.module("gadgetsStore")
.service('accountService', function ($http, registerUrl, tokenUrl, tokenKey) {
this.register = function (data) {
var request = $http.post(registerUrl, data);
return request;
}
this.generateAccessToken = function (loginData) {
var requestToken = $http({
method: 'POST',
url: tokenUrl,
data: $.param(loginData),
headers: {
'Content-Type': 'application/x-www-form-urlencoded; charset=UTF-8'
}
});
return requestToken;
}
this.isUserAuthenticated = function () {
var token = sessionStorage.getItem(tokenKey);
if (token)
return true;
else
return false;
}
this.logout = function () {
sessionStorage.removeItem(tokenKey);
}
});
Now the login button of the accountController changed in something like this:
Part of the accountController.js
// Generate Token - Login
$scope.login = function () {
$scope.result = '';
var loginData = {
grant_type: 'password',
username: $scope.loginEmail,
password: $scope.loginPassword
};
accountService.generateAccessToken(loginData)
.success(successLoginCallback)
.error(errorLoginCallback);
}
.. having the following success and error callbacks:
var successLoginCallback = function (result) {
console.log(result);
$location.path("/submitorder");
sessionStorage.setItem(tokenKey, result.access_token);
$scope.hasLoginError = false;
$scope.isAuthenticated = true;
}
var errorLoginCallback = function (data, status, headers, config) {
console.log(data);
$scope.hasLoginError = true;
$scope.loginErrorDescription = data.error_description;
}
I believe it’s much cleaner now.
| Reference: | AngularJS feat. Web API – Security from our NCG partner Christos Sakellarios at the chsakell’s Blog blog. |