Developing Web applications using AngularJS and Web API can be quite amuzing. You can pick this architecture in case you have in mind a web application with limitted page refreshes or post backs to the server while each application’s View is based on partial data retrieved from it. If this is what you want, then Web API would be responsible to serve the data and AngularJS to display them in an elegant way. The most important decisions you need to make when you start developing using these two frameworks, are the following:
- What project template to use?
- How and where to structure AngularJS?
- What happens in page refreshes?
- What type of authentication to use and how AngularJS can help with that?
We are going to answer all these questions by building a Gadget Store web application using AngularJS for front end and ASP.NET Web API as the back end. This will be done through two posts where this one will present you how to create all the required infrastructure (database, web api and angularjs level) while the second one will show you how to setup the authentication logic in your application. Let’s start.
Create a black solution named GadgetStore in Visual Studio and add the following projects:
- Domain (Class library)
- DataAccess (Class library)
- Store (Empty Web Application with templates MVC and Web API checked)
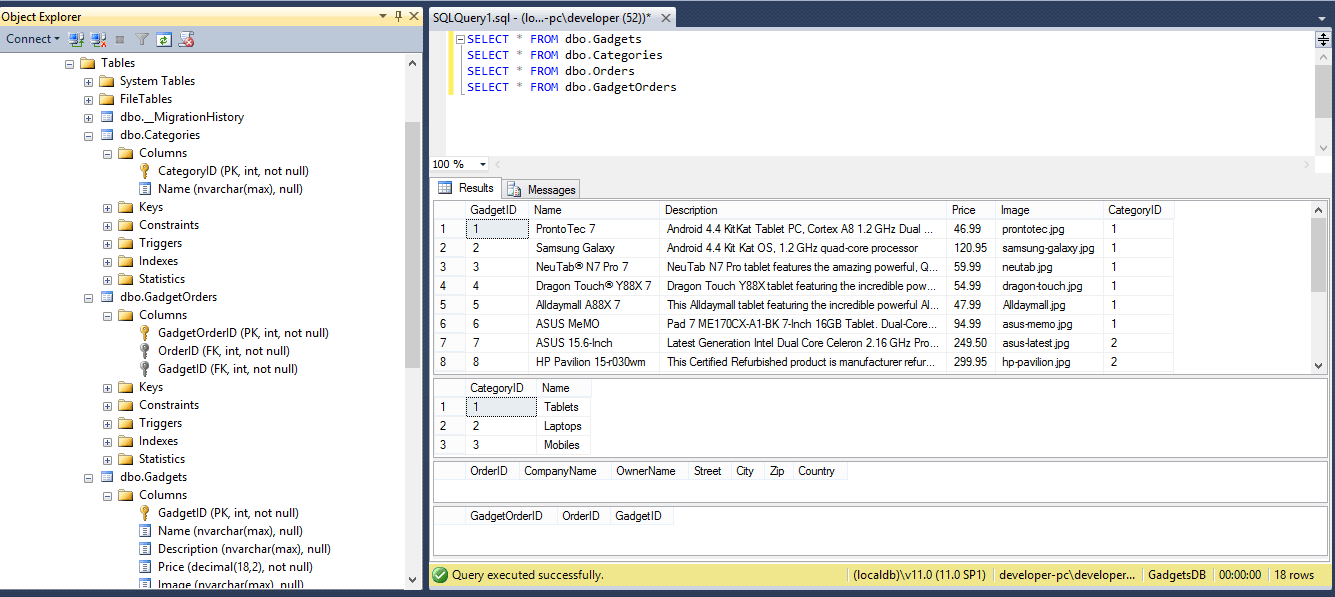
Let’s build our domain models first. We will use Entity Framework Code First development. Suppose that we are a company that sells Gadgets such as tablets, mobiles etc. Our provider has a website (our application) where we can order the gadgets we want to supply our customers. Hence, we need some classes to describe gadgets, gadget categories and orders. Add the following classes to the domain project.
Gadget
public class Gadget
    {
        public int GadgetID { get; set; }
        public string Name { get; set; }
        public string Description { get; set; }
        public decimal Price { get; set; }
        public string Image { get; set; }

        public int CategoryID { get; set; }
        public Category Category { get; set; }
    }
Category
public class Category
    {
        public int CategoryID { get; set; }
        public string Name { get; set; }

        public List<Gadget> Gadgets { get; set; }
    }
Order
public class Order
    {
        public Order()
        {
            Gadgets = new List<Gadget>();
        }

        public int OrderID { get; set; }
        public string CompanyName { get; set; }
        public string OwnerName { get; set; }
        public string Street { get; set; }
        public string City { get; set; }
        public string Zip { get; set; }
        public string Country { get; set; }

        public List<Gadget> Gadgets { get; set; }
    }
GadgetOrder
public class GadgetOrder
    {
        public int GadgetOrderID { get; set; }

        public int OrderID { get; set; }
        public Order Order { get; set; }

        public int GadgetID { get; set; }
        public Gadget Gadget { get; set; }
    }
Now let’s switch to the DataAccess project and configure Entity Framework. Make sure you add a reference to the Domain project and install Entity Framework from Nuget Packages. Add a Configurations folder and add the following two classes to it.
CategoryConfiguration
public class CategoryConfiguration : EntityTypeConfiguration<Category>
    {
        public CategoryConfiguration()
        {
            HasKey(c => c.CategoryID);

            Property(c => c.CategoryID).HasDatabaseGeneratedOption(DatabaseGeneratedOption.None);
        }
    }
OrderConfiguration
public class OrderConfiguration : EntityTypeConfiguration<Order>
    {
        public OrderConfiguration()
        {
            Ignore(o => o.Gadgets);
        }
    }
We want to manual set Category.CategoryID for gadget categories and also to ignore Order.Gadgets for our model. The latter will result that the database table Order will hold properties for all specified except for the Gadgets. To create our entities add the following class to the root of the current project.
StoreContext
public class StoreContext : DbContext
    {
        protected override void OnModelCreating(DbModelBuilder modelBuilder)
        {
            modelBuilder.Configurations.Add(new CategoryConfiguration());
            modelBuilder.Configurations.Add(new OrderConfiguration());
        }

        public DbSet<Gadget> Gadgets { get; set; }
        public DbSet<Category> Categories { get; set; }
        public DbSet<Order> Orders { get; set; }
        public DbSet<GadgetOrder> GadgetOrders { get; set; }
    }
We also need a database initializer so each time we fire our application some gadgets exist in the database:
StoreInitializer
public class StoreInitializer : DropCreateDatabaseIfModelChanges<StoreContext>
    {
        protected override void Seed(StoreContext context)
        {
            try
            {
                GetCategories().ForEach(c => context.Categories.Add(c));
                GetGadgets().ForEach(p => context.Gadgets.Add(p));
            }
            catch (Exception ex)
            {
                Debug.WriteLine(ex.Message);
            }
        }

        private static List<Category> GetCategories()
        {
            return new List<Category>
            {
                new Category {
                    CategoryID = 1,
                    Name = "Tablets"
                },
                new Category {
                    CategoryID = 2,
                    Name = "Laptops"
                },
                new Category {
                    CategoryID = 3,
                    Name = "Mobiles"
                },
            };
        }

        private static List<Gadget> GetGadgets()
        {
            return new List<Gadget>
            {
                new Gadget {
                    Name = "ProntoTec 7",
                    Description = "Android 4.4 KitKat Tablet PC, Cortex A8 1.2 GHz Dual Core Processor,512MB / 4GB,Dual Camera,G-Sensor (Black)",
                    CategoryID = 1,
                    Price = 46.99m,
                    Image = "prontotec.jpg"
                },
                new Gadget {
                    Name = "Samsung Galaxy",
                    Description = "Android 4.4 Kit Kat OS, 1.2 GHz quad-core processor",
                    CategoryID = 1,
                    Price = 120.95m,
                    Image= "samsung-galaxy.jpg"
                },
                new Gadget {
                    Name = "NeuTab® N7 Pro 7",
                    Description = "NeuTab N7 Pro tablet features the amazing powerful, Quad Core processor performs approximately Double multitasking running speed, and is more reliable than ever",
                    CategoryID = 1,
                    Price = 59.99m,
                    Image= "neutab.jpg"
                },
                new Gadget {
                    Name = "Dragon Touch® Y88X 7",
                    Description = "Dragon Touch Y88X tablet featuring the incredible powerful Allwinner Quad Core A33, up to four times faster CPU, ensures faster multitasking speed than ever. With the super-portable size, you get a robust power in a device that can be taken everywhere",
                    CategoryID = 1,
                    Price = 54.99m,
                    Image= "dragon-touch.jpg"
                },
                new Gadget {
                    Name = "Alldaymall A88X 7",
                    Description = "This Alldaymall tablet featuring the incredible powerful Allwinner Quad Core A33, up to four times faster CPU, ensures faster multitasking speed than ever. With the super-portable size, you get a robust power in a device that can be taken everywhere",
                    CategoryID = 1,
                    Price = 47.99m,
                    Image= "Alldaymall.jpg"
                },
                new Gadget {
                    Name = "ASUS MeMO",
                    Description = "Pad 7 ME170CX-A1-BK 7-Inch 16GB Tablet. Dual-Core Intel Atom Z2520 1.2GHz CPU",
                    CategoryID = 1,
                    Price = 94.99m,
                    Image= "asus-memo.jpg"
                },
                new Gadget {
                    Name = "ASUS 15.6-Inch",
                    Description = "Latest Generation Intel Dual Core Celeron 2.16 GHz Processor (turbo to 2.41 GHz)",
                    CategoryID = 2,
                    Price = 249.5m,
                    Image = "asus-latest.jpg"
                },
                new Gadget {
                    Name = "HP Pavilion 15-r030wm",
                    Description = "This Certified Refurbished product is manufacturer refurbished, shows limited or no wear, and includes all original accessories plus a 90-day warranty",
                    CategoryID = 2,
                    Price = 299.95m,
                    Image = "hp-pavilion.jpg"
                },
                new Gadget {
                    Name = "Dell Inspiron 15.6-Inch",
                    Description = "Intel Celeron N2830 Processor, 15.6-Inch Screen, Intel HD Graphics",
                    CategoryID = 2,
                    Price = 308.00m,
                    Image = "dell-inspiron.jpg"
                },
                new Gadget {
                    Name = "Acer Aspire E Notebook",
                    Description = "15.6 HD Active Matrix TFT Color LED (1366 x 768) 16:9 CineCrystal Display",
                    CategoryID = 2,
                    Price = 299.95m,
                    Image = "acer-aspire.jpg"
                },
                new Gadget {
                    Name = "HP Stream 13",
                    Description = "Intel Celeron N2840 Processor. 2 GB DDR3L SDRAM, 32 GB Solid-State Drive and 1TB OneDrive Cloud Storage for one year",
                    CategoryID = 2,
                    Price = 202.99m,
                    Image = "hp-stream.jpg"
                },
                new Gadget {
                    Name = "Nokia Lumia 521",
                    Description = "T-Mobile Cell Phone 4G - White. 5MP Camera - Snap creative photos with built-in digital lenses",
                    CategoryID = 3,
                    Price = 63.99m,
                    Image = "nokia-lumia.jpg"
                },
                new Gadget {
                    Name = "HTC Desire 816",
                    Description = "13 MP Rear Facing BSI Camera / 5 MP Front Facing",
                    CategoryID = 3,
                    Price = 177.99m,
                    Image = "htc-desire.jpg"
                },
                new Gadget {
                    Name = "Sanyo Innuendo",
                    Description = "Uniquely designed 3G-enabled messaging phone with side-flipping QWERTY keyboard and external glow-thru OLED dial pad that 'disappears' when not in use",
                    CategoryID = 3,
                    Price = 54.99m,
                    Image = "sanyo-innuendo.jpg"
                },
                new Gadget {
                    Name = "Ulefone N9000",
                    Description = "Unlocked world GSM phone. 3G-850/2100, 2G -850/900/1800/1900",
                    CategoryID = 3,
                    Price = 133.99m,
                    Image = "ulefone.jpg"
                }

            };
        }
    }
You can see that I have used specific images for the gadgets. Those images will be stored in an images folder in the MVC project so you can either use your own or simply download the solution we are building and follow along. Now it’s time to switch to the ASP.NET MVC project. First thing you need to do, is add references to both of the class library projects and install Entity Framework as well. In the Global.asax class we need to set the database initializer as follow:
Global.asax.cs
void Application_Start(object sender, EventArgs e)
        {
            // Code that runs on application startup
            AreaRegistration.RegisterAllAreas();
            GlobalConfiguration.Configure(WebApiConfig.Register);
            RouteConfig.RegisterRoutes(RouteTable.Routes);

            // Init Gadget Store database
            Database.SetInitializer(new StoreInitializer());
        }
We also need to tell Entity Framework where to create the StoreDB database so add a connectionString element to the Web.config file.
Web.config
<connectionStrings>
    <add name="StoreContext" providerName="System.Data.SqlClient" connectionString="Server=(localdb)\v11.0; Database=GadgetsDB; Trusted_Connection=true; MultipleActiveResultSets=true" />
  </connectionStrings>
Change the server name to reflect your system requirements. Let’s add the API Controllers which will be responsible to serve data to AngularJS views and retrieving as well.
CategoriesController
public class CategoriesController : ApiController
    {
        private StoreContext db = new StoreContext();

        // GET: api/Categories
        public IQueryable<Category> GetCategories()
        {
            return db.Categories;
        }

        // GET: api/Categories/5
        [ResponseType(typeof(Category))]
        public async Task<IHttpActionResult> GetCategory(int id)
        {
            Category category = await db.Categories.FindAsync(id);
            if (category == null)
            {
                return NotFound();
            }

            return Ok(category);
        }

        // PUT: api/Categories/5
        [ResponseType(typeof(void))]
        public async Task<IHttpActionResult> PutCategory(int id, Category category)
        {
            if (!ModelState.IsValid)
            {
                return BadRequest(ModelState);
            }

            if (id != category.CategoryID)
            {
                return BadRequest();
            }

            db.Entry(category).State = EntityState.Modified;

            try
            {
                await db.SaveChangesAsync();
            }
            catch (DbUpdateConcurrencyException)
            {
                if (!CategoryExists(id))
                {
                    return NotFound();
                }
                else
                {
                    throw;
                }
            }

            return StatusCode(HttpStatusCode.NoContent);
        }

        // POST: api/Categories
        [ResponseType(typeof(Category))]
        public async Task<IHttpActionResult> PostCategory(Category category)
        {
            if (!ModelState.IsValid)
            {
                return BadRequest(ModelState);
            }

            db.Categories.Add(category);
            await db.SaveChangesAsync();

            return CreatedAtRoute("DefaultApi", new { id = category.CategoryID }, category);
        }

        // DELETE: api/Categories/5
        [ResponseType(typeof(Category))]
        public async Task<IHttpActionResult> DeleteCategory(int id)
        {
            Category category = await db.Categories.FindAsync(id);
            if (category == null)
            {
                return NotFound();
            }

            db.Categories.Remove(category);
            await db.SaveChangesAsync();

            return Ok(category);
        }

        protected override void Dispose(bool disposing)
        {
            if (disposing)
            {
                db.Dispose();
            }
            base.Dispose(disposing);
        }

        private bool CategoryExists(int id)
        {
            return db.Categories.Count(g => g.CategoryID == id) > 0;
        }

    }
GadgetsController
public class GadgetsController : ApiController
    {
        private StoreContext db = new StoreContext();

        // GET: api/Gadgets
        public IQueryable<Gadget> GetGadgets()
        {
            return db.Gadgets;
        }

        // GET: api/Gadgets/5
        [ResponseType(typeof(Gadget))]
        public async Task<IHttpActionResult> GetGadget(int id)
        {
            Gadget gadget = await db.Gadgets.FindAsync(id);
            if (gadget == null)
            {
                return NotFound();
            }

            return Ok(gadget);
        }

        // PUT: api/Gadgets/5
        [ResponseType(typeof(void))]
        public async Task<IHttpActionResult> PutGadget(int id, Gadget gadget)
        {
            if (!ModelState.IsValid)
            {
                return BadRequest(ModelState);
            }

            if (id != gadget.GadgetID)
            {
                return BadRequest();
            }

            db.Entry(gadget).State = EntityState.Modified;

            try
            {
                await db.SaveChangesAsync();
            }
            catch (DbUpdateConcurrencyException)
            {
                if (!GadgetExists(id))
                {
                    return NotFound();
                }
                else
                {
                    throw;
                }
            }

            return StatusCode(HttpStatusCode.NoContent);
        }

        // POST: api/Gadgets
        [ResponseType(typeof(Gadget))]
        public async Task<IHttpActionResult> PostGadget(Gadget gadget)
        {
            if (!ModelState.IsValid)
            {
                return BadRequest(ModelState);
            }

            db.Gadgets.Add(gadget);
            await db.SaveChangesAsync();

            return CreatedAtRoute("DefaultApi", new { id = gadget.GadgetID }, gadget);
        }

        // DELETE: api/Gadgets/5
        [ResponseType(typeof(Gadget))]
        public async Task<IHttpActionResult> DeleteGadget(int id)
        {
            Gadget gadget = await db.Gadgets.FindAsync(id);
            if (gadget == null)
            {
                return NotFound();
            }

            db.Gadgets.Remove(gadget);
            await db.SaveChangesAsync();

            return Ok(gadget);
        }

        protected override void Dispose(bool disposing)
        {
            if (disposing)
            {
                db.Dispose();
            }
            base.Dispose(disposing);
        }

        private bool GadgetExists(int id)
        {
            return db.Gadgets.Count(g => g.GadgetID == id) > 0;
        }
    }
OrdersController
public class OrdersController : ApiController
    {
        private StoreContext db = new StoreContext();

        // GET: api/Orders
        public IQueryable<Order> GetOrders()
        {
            return db.Orders;
        }

        // GET: api/Orders/5
        [ResponseType(typeof(Order))]
        public async Task<IHttpActionResult> GetOrder(int id)
        {
            Order order = await db.Orders.FindAsync(id);
            if (order == null)
            {
                return NotFound();
            }

            return Ok(order);
        }

        // PUT: api/Orders/5
        [ResponseType(typeof(void))]
        public async Task<IHttpActionResult> PutOrder(int id, Order order)
        {
            if (!ModelState.IsValid)
            {
                return BadRequest(ModelState);
            }

            if (id != order.OrderID)
            {
                return BadRequest();
            }

            db.Entry(order).State = EntityState.Modified;

            try
            {
                await db.SaveChangesAsync();
            }
            catch (DbUpdateConcurrencyException)
            {
                if (!OrderExists(id))
                {
                    return NotFound();
                }
                else
                {
                    throw;
                }
            }

            return StatusCode(HttpStatusCode.NoContent);
        }

        // POST: api/Orders
        [ResponseType(typeof(Order))]
        public async Task<IHttpActionResult> PostOrder(Order order)
        {
            if (!ModelState.IsValid)
            {
                return BadRequest(ModelState);
            }

            try
            {
                db.Orders.Add(order);

                foreach(Gadget gadget in order.Gadgets)
                {
                    db.GadgetOrders.Add(new GadgetOrder
                        {
                             OrderID = order.OrderID,
                             GadgetID = gadget.GadgetID
                        });
                }

                await db.SaveChangesAsync();
            }
            catch(Exception ex)
            {
                return BadRequest(ex.Message);
            }

            return CreatedAtRoute("Default", new { controller = "Home", action = "ViewOrder", id = order.OrderID }, order);
        }

        // DELETE: api/Orders/5
        [ResponseType(typeof(Order))]
        public async Task<IHttpActionResult> DeleteOrder(int id)
        {
            Order order = await db.Orders.FindAsync(id);
            if (order == null)
            {
                return NotFound();
            }

            db.Orders.Remove(order);
            await db.SaveChangesAsync();

            return Ok(order);
        }

        protected override void Dispose(bool disposing)
        {
            if (disposing)
            {
                db.Dispose();
            }
            base.Dispose(disposing);
        }

        private bool OrderExists(int id)
        {
            return db.Orders.Count(g => g.OrderID == id) > 0;
        }
    }
We are not gonna use all of the controllers actions that’s why I highlighted those that the AngularJS application will invoke for sure. At this very point you can build the application and request the gadgets from the browser. Ensure that the database has been successfully created.
Before starting your application you may have to set
System.Web.Mvc reference, Copy Local property to True, from the properties window.
AngularJS
It’s time to setup our AngularJS components. Mind that this is not an AngularJS tutorial so I assume you have already some experience developing with AngularJS. If you don’t however, that’s fine, this is a good opportunity to understand how this framework makes easy to develop SPA Web Applications using the Web API. So, to start with, install Bootstrap and AngularJS from Nuget Packages. This will add a Scripts, fonts and Content folder to your application with the required components for the installed frameworks. When I told you to create the Web application project I mentioned to leave both the MVC and Web API templates options checked. Well, the idea is to have some pure MVC controllers that responds to certain routes and aspects of your application. When an MVC view is render, multiple related views can be render dynamically using AngularJS features without posting back to server.
We need to set an initial view for our store application so let’s do it. Add an MVC Controller in the controllers directory named HomeController if not already exists.
HomeController
public class HomeController : Controller
    {
        // GET: Home
        public ActionResult Index()
        {
            return View();
        }

        // Renders Order details as soon as an order has been submitted
        public ActionResult ViewOrder(int id)
        {
            using (var context = new StoreContext())
            {
                var order = context.Orders.Find(id);

                var gadgetOrders = context.GadgetOrders.Where(go => go.OrderID == id);

                foreach(GadgetOrder gadgetOrder in gadgetOrders)
                {
                    context.Entry(gadgetOrder).Reference(go => go.Gadget).Load();
                    order.Gadgets.Add(gadgetOrder.Gadget);
                }

                return View(order);
            }
        }
    }
Right click inside the Index action and add a View. Set the View’s name as Index and make sure you leave all the checkboxes unchecked. This will create our basic View under the Views/Home/Index.cshtml View file. You can see a ViewOrder action but for now we can skip it’s purpose. Before show you Index’s code let’s create AngularJS required folders for our app. Create an app folder at the root directory and add a main.App.js javascript file. This will be AngularJS bootstrap file (do not confuse it with CSS related bootstrap). Under the same folder add the following ones:
- Components (will we ‘ll add a cart component later)
- Controllers (this is where AngularJS controllers will be)
- Filters (we will create add some filters here)
- Views (the partial views that will dynamically render)
Now let’s see:
Index.cshtml
@{
    Layout = null;
}
<!DOCTYPE html>
<html ng-app="gadgetsStore">
<head>
    <title>Gadget Store</title>
    <link href="../../Content/bootstrap.css" rel="stylesheet" type="text/css" />
</head>
<body ng-controller='gadgetStoreCtrl' class="container">
    <div class="navbar navbar-default" role="navigation" ng-hide="checkoutComplete()">
        <a class="navbar-brand" href="#">Gadgets</a>
        <div class="col-sm-6 col-md-6" ng-show="showFilter()">
            <form class="navbar-form" role="search">
                <div class="input-group">
                    <input type="text" class="form-control input-group-lg" placeholder="Filter gadgets.." ng-model="searchItem">
                </div>
            </form>
        </div>
        <cart-details></cart-details>
    </div>
    <div class="alert alert-danger" ng-show="data.error" ng-cloak>
        Error ({{data.error.status}}). Gadget's weren't not loaded.
        <a href="#" class="alert-link">Click here to try again</a>
    </div>
    <ng-view />
    <script src="../../Scripts/angular.js" type="text/javascript"></script>
    <script src="../../Scripts/angular-route.js" type="text/javascript"></script>
    <script src="../../app/mainApp.js"></script>
    <script src="../../app/controllers/gadgetsStore.js" type="text/javascript"></script>
    <script src="../../app/filters/storeFilters.js" type="text/javascript"></script>
    <script src="../../app/controllers/gadgetsControllers.js" type="text/javascript"></script>
    <script src="../../app/components/cartCmp.js" type="text/javascript"></script>
    <script src="../../app/controllers/checkoutController.js" type="text/javascript"></script>
</body>
</html>
OK, take a deep breath now.. I know we haven’t created most of the referenced scripts till now but we will do so step by step while explaining the purpose of each file or component. You can run your application when we finish adding all the required files to our application. For demonstration purposes, every time we add a view I will show you how the result will look like when you complete this post. Take a look at the highlighted lines 5,10,26,29 It’s time to tell AngularJS that we want to handle this HTML page as an AngularJS application. The top level module of our application is named gadgetsStore and it’s being setup at the mainApp.js top level javascript file. gadgetStoreCtrl controller is the top lever controller, responsible to retrieve or post data to the server. As a top lever controller makes inner views controllers able to share data. The ng-view tells angular that this is where we want our partial views to be render when asked. Let’s see now the mainApp.js code.
mainApp.js
angular.module("gadgetsStore", ["storeFilters", "storeCart", "ngRoute"])
			.config(function ($routeProvider) {
			    $routeProvider.when("/gadgets", {
			        templateUrl: "app/views/gadgets.html"
			    });
			    $routeProvider.when("/checkout", {
			        templateUrl: "app/views/checkout.html"
			    });
			    $routeProvider.when("/submitorder", {
			        templateUrl: "app/views/submitOrder.html"
			    });
			    $routeProvider.when("/complete", {
			        templateUrl: "app/views/orderSubmitted.html"
			    });
			    $routeProvider.otherwise({
			        templateUrl: "app/views/gadgets.html"
			    });
			});
Here we created the basic application’s module while injecting some of our custom modules storeFilters, storeCart plus AngularJS ngRoute for setting our routing system.
Add a gadgetStoreCtrl.js file in the app/controllers folder.
gadgetStoreCtrl.js
angular.module('gadgetsStore')
	.constant('gadgetsUrl', 'http://localhost:your_port_here/api/gadgets')
	.constant('ordersUrl', 'http://localhost:your_port_here/api/orders')
	.constant('categoriesUrl', 'http://localhost:your_port_here/api/categories')
	.controller('gadgetStoreCtrl', function ($scope, $http, $location, gadgetsUrl, categoriesUrl, ordersUrl, cart) {

	    $scope.data = {};

	    $http.get(gadgetsUrl)
			.success(function (data) {
			    $scope.data.gadgets = data;
			})
			.error(function (error) {
			    $scope.data.error = error;
			});

	    $http.get(categoriesUrl)
        .success(function (data) {
            $scope.data.categories = data;
        })
        .error(function (error) {
            $scope.data.error = error;
        });

	    $scope.sendOrder = function (shippingDetails) {
	        var order = angular.copy(shippingDetails);
	        order.gadgets = cart.getProducts();
	        $http.post(ordersUrl, order)
			.success(function (data, status, headers, config) {
			    $scope.data.OrderLocation = headers('Location');
			    $scope.data.OrderID = data.OrderID;
			    cart.getProducts().length = 0;
			})
			.error(function (error) {
			    $scope.data.orderError = error;
			}).finally(function () {
			    $location.path("/complete");
			});
	    }

	    $scope.showFilter = function()
	    {
	        return $location.path() == '';
	    }

	    $scope.checkoutComplete = function () {
	        return $location.path() == '/complete';
	    }

	});
This controller is responsible for fetching gadgets from the GadgetsController and categories from the CategoriesController. Moreover, using the sendOrder function can post Orders back to server.
Since this controller is applied at the Index.cshtml body element, the $scope.data is accessible through all the views rendered in this file. Now let’s take one by one the routes and add the required files. The first of our routes (/gadgets) will render a gadgets.html partial view so add this file under app/views/ folder.
gadgets.html
<div class="" ng-controller="gadgetsCtrl" ng-hide="data.error">
    <div class="col-xs-3">
        <a ng-click="selectCategory()" class="btn btn-block btn-default btn-lg">Home</a>
        <a ng-repeat="item in data.categories | orderBy:'CategoryID'" ng-click="selectCategory(item.CategoryID)"
           class=" btn btn-block btn-default btn-lg" ng-class="getCategoryClass(item.CategoryID)">
            {{item.Name}}
        </a>
    </div>
    <div class="col-xs-9">
        <div class="panel panel-default" ng-repeat="item in data.gadgets | filter:categoryFilterFn | filter:searchItem | range:selectedPage:pageSize">
            <div class="panel-heading">
                <strong>{{item.Name}}</strong>
                <span class="pull-right label label-primary">
                    {{item.Price | currency}}
                </span>
            </div>
            <div class="panel-body">
                <div class="media">
                    <a class="pull-left" href="#">
                        <img class="media-object" ng-src="../../images/{{item.Image}}" />
                    </a>
                    <div class="media-body">
                        <span class="lead">{{item.Description}}</span>
                    </div>
                </div>
            </div>
            <div class="panel-footer">
                <a ng-click="addProductToCart(item)" class="btn btn-success">
                    Add to cart
                </a>
            </div>
        </div>
        <div class="pull-right btn-group">
            <a ng-repeat="page in data.gadgets | filter:categoryFilterFn | filter:searchItem | pageCount:pageSize"
               ng-click="selectPage($index + 1)" class="btn btn-default" ng-class="getPageClass($index + 1)">
                {{$index + 1}}
            </a>
        </div>
    </div>
</div>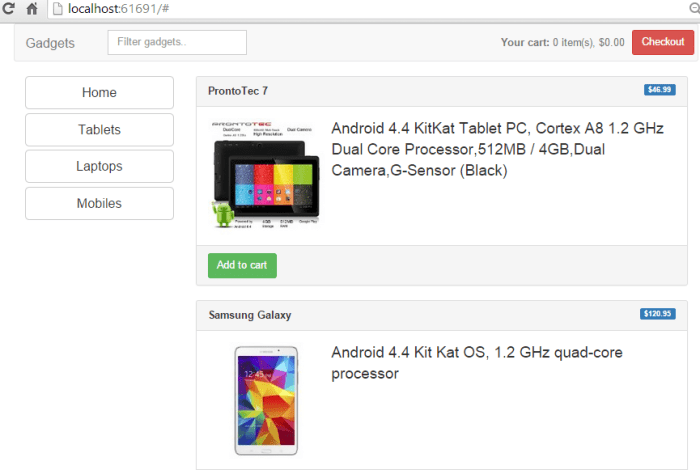
This View is responsible to display a left bootstrap column with all the Gadget categories and the basic column where all the Gadgets with their details are displayed. It’s controller gadgetsCtrl is responsible to display specific category’s gadgets when some of them is clicked, paging through the gadgets and adding gadgets to a cart. Add a gadgetsCtrl.js file under the app/controllers folder.
gadgetsCtrl.js
angular.module("gadgetsStore")
.constant('gadgetsActiveClass', 'btn-primary')
.constant('gadgetsPageCount', 3)
.controller("gadgetsCtrl", function ($scope, $filter, gadgetsActiveClass, gadgetsPageCount, cart) {
    var selectedCategory = null;

    $scope.selectedPage = 1;
    $scope.pageSize = gadgetsPageCount;

    $scope.selectPage = function (newPage) {
        $scope.selectedPage = newPage;
    }

    $scope.selectCategory = function (newCategory) {
        selectedCategory = newCategory;
        $scope.selectedPage = 1;
    }

    $scope.categoryFilterFn = function (product) {
        return selectedCategory == null || product.CategoryID == selectedCategory;
    }

    $scope.getCategoryClass = function (category) {
        return selectedCategory == category ? gadgetsActiveClass : "";
    }

    $scope.getPageClass = function (page) {
        return $scope.selectedPage == page ? gadgetsActiveClass : "";
    }

    $scope.addProductToCart = function (product) {
        cart.addProduct(product.GadgetID, product.Name, product.Price, product.CategoryID);
    }
});
Take a look at the first line of code. When we call AngularJS module function without the injected modules array, we actually asks for angular to return and not to create the specific module. The second route we setup at the beginning was the /checkout which renders the partial view checkout.html. Add this file under app/views.
checkout.html
<h2>
    Your cart
</h2>
<div ng-controller="cartDetailsController">
    <div class="alert alert-warning" ng-show="cartData.length == 0">
        There are no gadgets in your shopping cart. <a href="#" class="alert-link">
            Click here to return to the catalogue
        </a>
    </div>
    <div ng-hide="cartData.length == 0">
        <table class="table table-striped">
            <thead>
                <tr>
                    <th>
                        Quantity
                    </th>
                    <th>
                        Item
                    </th>
                    <th class="text-right">
                        Price
                    </th>
                    <th class="text-right">
                        Subtotal
                    </th>
                </tr>
            </thead>
            <tbody>
                <tr ng-repeat="item in cartData">
                    <td class="text-center">
                        {{item.count}}
                    </td>
                    <td class="text-left">
                        {{item.Name}}
                    </td>
                    <td class="text-right">
                        {{item.Price | currency}}
                    </td>
                    <td class="text-right">
                        {{ (item.Price * item.count) | currency}}
                    </td>
                    <td>
                        <button ng-click="remove(item.GadgetID)" class="btn btn-sm btn-warning pull-right">
                            Remove
                        </button>
                    </td>
                </tr>
            </tbody>
            <tfoot>
                <tr>
                    <td colspan="3" class="text-right">
                        Total:
                    </td>
                    <td class="text-right">
                        {{total() | currency}}
                    </td>
                </tr>
            </tfoot>
        </table>
        <div class="text-center pull-right">
            <a class="btn btn-primary" href="#">Continue shopping</a>
            <a class="btn btn-primary" href="#/submitorder">Place order now</a>
        </div>
    </div>
</div>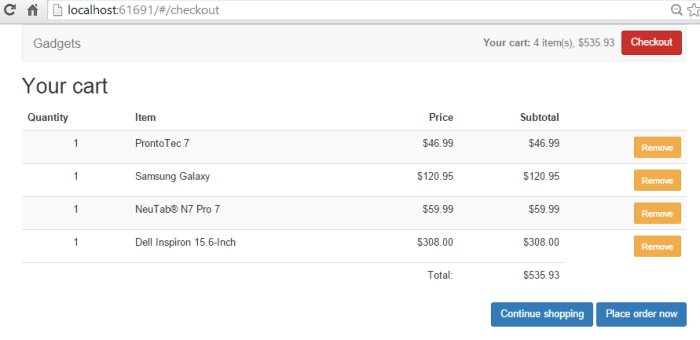
The cartDetailsController will be responsible to display your cart’s details before submitting your order. Add a checkoutController in the app/controllers folder.
checkoutController.js
angular.module("gadgetsStore")
.controller("cartDetailsController", function ($scope, cart) {

    $scope.cartData = cart.getProducts();

    $scope.total = function () {
        var total = 0;
        for (var i = 0; i < $scope.cartData.length; i++) {
            total += ($scope.cartData[i].Price * $scope.cartData[i].count);
        }
        return total;
    }

    $scope.remove = function (id) {
        cart.removeProduct(id);
    }
});
You will propably have noticed that some of our controllers are injected a cart factory component. Let’s create this as well. You can understand that a cart can be considered as an abstract component by itself and that’s why we are going to add the relative files to the app/components folder.
cartCmp.js
var storeCart = angular.module('storeCart', []);

storeCart.factory('cart', function () {
    var cartData = [];

    return {
        addProduct: function (id, name, price, category) {
            var addedToExistingItem = false;
            for (var i = 0; i < cartData.length; i++) {
                if (cartData[i].GadgetID == id) {
                    cartData[i].count++;
                    addedToExistingItem = true;
                    break;
                }
            }
            if (!addedToExistingItem) {
                cartData.push({
                    count: 1, GadgetID: id, Price: price, Name: name, CategoryID: category
                });
            }
        },
        removeProduct: function (id) {
            for (var i = 0; i < cartData.length; i++) {
                if (cartData[i].GadgetID == id) {
                    cartData.splice(i, 1);
                    break;
                }
            }
        },
        getProducts: function () {
            return cartData;
        }
    };
});


storeCart.directive("cartDetails", function (cart) {
    return {
        restrict: "E",
        templateUrl: "/app/components/cartDetails.html",
        controller: function ($scope) {
            var cartData = cart.getProducts();
            $scope.total = function () {
                var total = 0;
                for (var i = 0; i < cartData.length; i++) {
                    total += (cartData[i].Price * cartData[i].count);
                }
                return total;
            }
            $scope.itemCount = function () {
                var total = 0;
                for (var i = 0; i < cartData.length; i++) {
                    total += cartData[i].count;
                }
                return total;
            }
        }
    };
});
Beside the factory methods thar are able to add or remove gadgets from the cart, I would like to point out the custom directive for rendering our cart details. You can see that we named our directive cartDetails but in the Index.cshtml file we add a cart-details custom html element.. This is a convention that AngularJS expects from custom directives.
cartDetails.html
<style>
    .navbar-right {
        float: right !important;
        margin-right: 5px;
    }

    .navbar-text {
        margin-right: 10px;
    }
</style>
<div class="navbar-right">
    <div class="navbar-text">
        <b>Your cart:</b> {{itemCount()}} item(s), {{total() | currency}}
    </div>
    <a href="#/checkout" class="btn btn-danger navbar-btn">Checkout</a>
</div>
We have also used some custom filters till now for paging through our gadgets list. Add a storeFilter.js file under the app.filters folder.
storeFilters.js
var storeFilters = angular.module('storeFilters', []);

storeFilters.filter("range", function ($filter) {
    return function (data, page, size) {
        if (angular.isArray(data) && angular.isNumber(page) && angular.isNumber(size)) {
            var start_index = (page - 1) * size;
            if (data.length < start_index) {
                return [];
            } else {
                return $filter("limitTo")(data.splice(start_index), size);
            }
        } else {
            return data;
        }
    }
});

storeFilters.filter("pageCount", function () {
    return function (data, size) {
        if (angular.isArray(data)) {
            var result = [];
            for (var i = 0; i < Math.ceil(data.length / size) ; i++) {
                result.push(i);
            }
            return result;
        } else {
            return data;
        }
    }
});
The next route we wanna setup is the /submitorder which renders the submitOrder.html partial view. Add this file under app/views folder.
submitOrder.html
<style>
    .ng-invalid {
        border-color: brown;
    }

    .ng-valid {
        border-color: lightgreen;
    }

    span.error {
        color: red;
        font-weight: bold;
    }
</style>
<h2>
    Check out
</h2>
<p>
    Enter your shipping details below, and we'll ship your goods as far as possible!
</p>
<form name="shippingForm" novalidate>
    <div class="well col-md-6">
        <div class="form-group">
            <input name="companyName" class="form-control" ng-model="data.shipping.CompanyName" required placeholder="Company Name" />
            <span class="error" ng-show="shippingForm.companyName.$error.required">
                Please enter your Company
            </span>
        </div>
        <div class="form-group">
            <input name="name" class="form-control" ng-model="data.shipping.OwnerName" required placeholder="Full Name" />
            <span class="error" ng-show="shippingForm.name.$error.required">
                Please enter your Full Name
            </span>
        </div>

        <div class="form-group">
            <input name="street" class="form-control" ng-model="data.shipping.Street" placeholder="Shippping Address" required />
            <span class="error" ng-show="shippingForm.street.$error.required">
                Please enter a street
                address
            </span>
        </div>
        <div class="form-group">
            <input name="city" class="form-control" ng-model="data.shipping.City" placeholder="City" required />
            <span class="error" ng-show="shippingForm.city.$error.required">
                Please enter a city
            </span>
        </div>
        <div class="form-group">
            <input name="zip" class="form-control" ng-model="data.shipping.Zip" placeholder="Zip" required />
            <span class="error" ng-show="shippingForm.zip.$error.required">
                Please enter a zip code
            </span>
        </div>
        <div class="form-group">
            <input name="country" class="form-control" ng-model="data.shipping.Country" placeholder="Country" required />
            <span class="error" ng-show="shippingForm.country.$error.required">
                Please enter a country
            </span>
        </div>
        <div class="text-center">
            <button ng-disabled="shippingForm.$invalid" class="btn btn-primary pull-left" ng-click="sendOrder(data.shipping)">
                Complete order
            </button>
        </div>
    </div>
</form>
This is a common bootstrap form with some validation applied on it. The complete order button is activated only if all fields are filled. Now if you remember we told our top level controller (gadgetsStore) that when the order is submitted successfully or not, change the location to /complete. This is done via the $location AngularJS service.
$scope.sendOrder = function (shippingDetails) {
	        var order = angular.copy(shippingDetails);
	        order.gadgets = cart.getProducts();
	        $http.post(ordersUrl, order)
			.success(function (data, status, headers, config) {
			    $scope.data.OrderLocation = headers('Location');
			    $scope.data.OrderID = data.OrderID;
			    cart.getProducts().length = 0;
			})
			.error(function (error) {
			    $scope.data.orderError = error;
			}).finally(function () {
			    $location.path("/complete");
			});
	    }
Notice also that on success, we read the location header result from the OrdersController POST action in order to render a link to our submitted order. Add the orderSubmitted.html partial view under the app.views folder.
orderSubmitted.html
<div class="alert alert-danger" ng-show="data.orderError">
    Error ({{data.orderError.status}}). The order could not be placed. <a href="#/submitorder"
                                                                          class="alert-link">Click here to try again</a>
</div>
<div class="panel panel-default" ng-hide="data.orderError">
    <div class="panel-heading">
        <h3>Your order has been submitted successfully!</h3>
    </div>
    <div class="panel-body">
        Thanks for placing your order. We'll ship your gadgets as soon as possible. Your order's Identity number is
         {{data.OrderID}}. <br/>
    </div>
    <div class="panel-footer">
        <a href="#" class="btn btn-danger btn-sm">Back to gadgets</a>
        <a href="{{data.OrderLocation}}" class="btn btn-default btn-sm">View order</a>
    </div>
</div>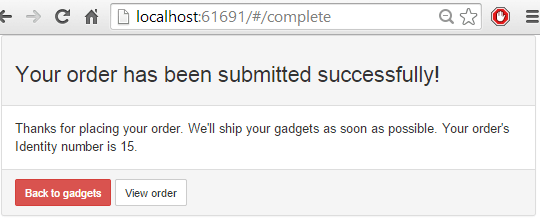
The most important line to notice here is the highlighted. Let’s recall what the OrdersController POST methods returns.
// POST: api/Orders
        [ResponseType(typeof(Order))]
        public async Task<IHttpActionResult> PostOrder(Order order)
        {
            if (!ModelState.IsValid)
            {
                return BadRequest(ModelState);
            }

            try
            {
                db.Orders.Add(order);

                foreach(Gadget gadget in order.Gadgets)
                {
                    db.GadgetOrders.Add(new GadgetOrder
                        {
                             OrderID = order.OrderID,
                             GadgetID = gadget.GadgetID
                        });
                }

                await db.SaveChangesAsync();
            }
            catch(Exception ex)
            {
                return BadRequest(ex.Message);
            }

            return CreatedAtRoute("Default", new { controller = "Home", action = "ViewOrder", id = order.OrderID }, order);
        }
The highlighted line will add a Location header to the response, with a link created based on the ‘Default’ MVC route which exists by default when creating an MVC application.
public class RouteConfig
    {
        public static void RegisterRoutes(RouteCollection routes)
        {
            routes.IgnoreRoute("{resource}.axd/{*pathInfo}");

            routes.MapRoute(
                name: "Default",
                url: "{controller}/{action}/{id}",
                defaults: new { controller = "Home", action = "Index", id = UrlParameter.Optional }
            );
        }
    }
So the link will send us to the ViewOrder action method of the Home MVC controller. If you recall we have already created this action.
HomeController
// Renders Order details as soon as an order has been submitted
        public ActionResult ViewOrder(int id)
        {
            using (var context = new StoreContext())
            {
                var order = context.Orders.Find(id);

                var gadgetOrders = context.GadgetOrders.Where(go => go.OrderID == id);

                foreach(GadgetOrder gadgetOrder in gadgetOrders)
                {
                    context.Entry(gadgetOrder).Reference(go => go.Gadget).Load();
                    order.Gadgets.Add(gadgetOrder.Gadget);
                }

                return View(order);
            }
        }
Right click in the action and add a View named ViewOrder, leaving the checkboxes unchecked. This will create ViewOrder.cshtml file under Views/Home folder. Paste the following code in the new file.
ViewOrder.cshtml
@model Domain.Order

@{
    Layout = null;
}

<!DOCTYPE html>

<html>
<head>
    <meta name="viewport" content="width=device-width" />
    <title>Order Details</title>
    <link href="../../Content/bootstrap.css" rel="stylesheet" type="text/css" />
</head>
<body>
    <div>
        <div class="panel panel-default">
            <div class="panel-heading">
                <span class="label label-success">@Model.CompanyName</span> |
                <span class="label label-success">@Model.OwnerName</span> |
                <span class="label label-success">@Model.Street</span> |
                <span class="label label-success">@Model.City</span> |
                <span class="label label-success">@Model.Zip</span> |
                <span class="label label-success">@Model.Country</span>
            </div>
                <h4>Order's gadgets</h4>
                @foreach (var gadget in Model.Gadgets.Distinct())
                {
                    @Html.Partial("Order", gadget)
                }
            <div class="panel-footer">
                @Html.ActionLink("Back to gadgets", "Index")
            </div>
        </div>
    </div>
</body>
</html>
For each order I display the basic details but for each distint gadget in that order, I decided to render a partial view. This way we can keep things cleaner. Add a new folder named Shared if not exist under the Views folder and create a partial view named Order. This partial view accepts a Gadget object and renders it’s details.
Order.cshtml
@model Domain.Gadget

<div class="panel-body">
    <div class="media">
        <a class="pull-left" href="#">
            <img class="media-object" src="../../images/@Model.Image" />
        </a>
        <div class="media-body">
            <h4 class="media-heading">
                @Model.Name
            </h4>
            <p>@Model.Description</p>
        </div>
    </div>
</div>
Believe it or not, we are done. Now you can build and run your application and hopefully you will not receive any errors. If you do so, you can always download the complete solution at the bottom of this post.
Food for thought
When you decide to build applications using AngularJS, be prepared for having a lots of files (mostly javascript and html) to manipulate. The structure we used it’s good ONLY for small size applications and only. If you had a larger application you would need a different folder structure to host your AngularJS components. We can talk more about this in an upcoming post. We saw how to use Web API to fetch or post data from and to the server respectively, but we haven’t setup any authentication logic to our application yet. More over, if you refresh the page, you will see that you lose instantly any gadgets you have added to your cart. Well.. this is what we ‘re gonna see in the next post, so make sure you follow the blog to get notified!
- Download the project we built from here.
I hope you enjoyed the post!
| Reference: | AngularJS feat. Web API from our NCG partner Christos Sakellarios at the chsakell’s Blog blog. |

Nice article, clean and simple.
There is a typo at \app\components\cartCmp.js breaking the app:
It should be /app/views/cartDetails.html instead of /app/*components*/cartDetails.html at templateUrl parameter.