Griffin Editor is a markdown editor with support for keyboard shortcuts, syntax highlighting, theming, preview etc.
My last check in for Griffin Editor was about three years ago. When I wrote the last version I barely knew how to write modular JavaScript libraries. I still don’t. That’s why TypeScript is so nice :) The editor is much easier to extend and customize compared to the old version.
The UI
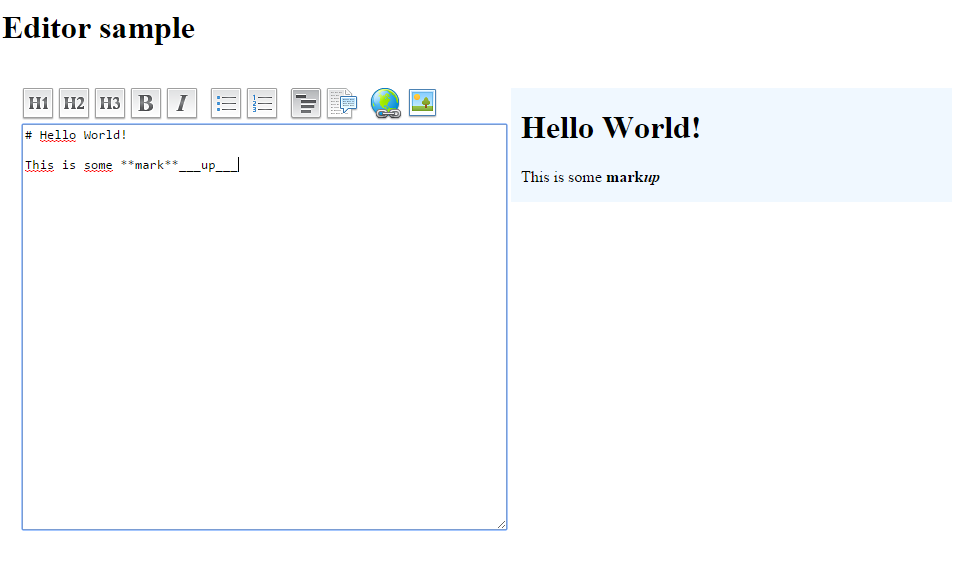
The toolbar buttons looks a bit out of date, and they are :) Feel free to contribute fresher looking icons. The great thing is however that they are easy customize, because the layout is not built into the library.
Here is a sample layout
<div id="editor">
<!-- TOOLBAR layout -->
<div class="toolbar">
<span class="button-h1" accesskey="1" title="Heading 1"><img src="images/h1.png" /></span>
<span class="button-h2" accesskey="2" title="Heading 2"><img src="images/h2.png" /></span>
<span class="button-h3" accesskey="3" title="Heading 3"><img src="images/h3.png" /></span>
<span class="button-bold" accesskey="b" title="Bold text"><img src="images/bold.png" /></span>
<span class="button-italic" accesskey="i" title="Italic text"><img src="images/italic.png" /></span>
<span class="divider"> </span>
<span class="button-bullets" accesskey="l" title="Bullet List"><img src="images/bullets.png" /></span>
<span class="button-numbers" accesskey="n" title="Ordered list"><img src="images/numbers.png" /></span>
<span class="divider"> </span>
<span class="button-sourcecode" accesskey="k" title="Source code"><img src="images/source_code.png" /></span>
<span class="button-quote" accesskey="q" title="Qoutation"><img src="images/document_quote.png" /></span>
<span class="divider"> </span>
<span class="button-link" accesskey="l" title="Insert link"><img src="images/link.png" /></span>
<span class="button-image" accesskey="p" title="Insert picture/image"><img src="images/picture.png" /></span>
</div>
<!-- The actual text area -->
<textarea class="area"># Hello World!</textarea>
</div>Key mapping
Each toolbar button has a CSS class that begin with button-. Those are used to bind actions to each toolbar button.
Hotkeys
You can also see that each button has a accesskey defined. Those are also picked up by the library and are mapped to the CONTROL key when you are within the textarea. You can for instance press CTRL+1 to create a new H1 heading.
Preview
To enable preview you need to add another DIV element to the page. It should be named as the ID for the container div, but with -preview as suffix. In the example above the container div is named editor, thus we need to add the following div:
<div id="editor-preview">
</div>
(you also need to configure a markdown parser library, more on that later).
Theming
As no HTML is built in you can customize the UI in whatever way you like as long as you stick with the conventions mentioned above.
- Put a ID on the container div
- Add
button-actionNameas class name for each toolbar button - Use
accesskeyon each toolbar button to enable keyboard shortcuts. - Use
editorID-previewas name on the preview window
The library
The library still have some dependencies on jQuery, those will be removed during the next months (or faster if someone contributes changes). Other than that the library have not built in dependencies.
To get started include the JavaScript files and load the editor.
<script src="Scripts/jquery-2.1.4.min.js"></script>
<script src="Scripts/GriffinEditor.js"></script>
<script type="text/javascript">
    new Griffin.Editor('editor');
</script>
That’s it.
Previews
To be able to preview the result you need to select a markdown parser library. I recommend marked as it supports github tables and fenced code blocks etc. Which library do however not matter as you write a small adapter to allow the editor to use it.
The following code demonstrates how to use marked:
var markedAdapter = {
    parse: function (text) {
        return marked(text);
    }
}
var editor = new Griffin.Editor('editor', markedAdapter);
editor.preview();
If you want to activate the support for GFM you need to configure marked:
marked.setOptions({
    renderer: new marked.Renderer(),
    gfm: true,
    tables: true,
    breaks: false,
    pedantic: false,
    sanitize: true,
    smartLists: true,
    smartypants: false
});
The same technique can be used for your favorite markdown parser.
Hotkeys
Hotkeys do not need any special configuration. It was however a bit tricky to get them working with plain JavaScript. This section is just to let you know how to do it (if you like to add support in your own code).
The event to use is keyup as it’s triggered once for each key combination compared to keydown is is triggered multiple times every time you press a key.
The tricky part is that the browser will steal some key presses when you only use keyup. For instance CTRL+1 is used in Chrome to select the first tab. To get around that you need to use keydown. But if you prefer simplicity it’s not fun as you need to start manage key states (to filter out each unique key press among all raised events).
My approach was simply to steal all keydown events that are for my key bindings. The code is something like this (simplified a bit to easier demonstrate the point):
document.addEventListener('keydown', (e: KeyboardEvent) => {
    if (e.target !== self.element)
        return;
    if (isEventForMyKeyBindings(e) {
        e.cancelBubble = true;
        e.stopPropagation();
        e.preventDefault();
    }
});
this.element.addEventListener('keyup', (e: KeyboardEvent) => {
    if (!e.ctrlKey)
        return;

    var key = String.fromCharCode(e.which);
    if (!key || key.length === 0)
        return;

    var actionName = this.keyMap[key];
    if (actionName) {
        this.invokeAction(actionName);
        self.preview();
    }
});
In that way everything works just fine for all keybindings.
Syntax highlighting
Syntax highlighting is used to make the source code in the preview window pretty. The same approach is used for syntax highlighting as for the markdown parser. You write a small adapter.
I prefer to use the prismjs library.
var markedAdapter = {
    parse: function (text) {
        return marked(text);
    }
}
var prismAdapter = {
    highlight: function (blockElements, inlineElements) {
        blockElements.forEach(function(item) {
            Prism.highlightElement(item);
        });

    }
};
var editor = new Griffin.Editor('editor', markedAdapter );
editor.syntaxHighlighter = prismAdapter ;
editor.preview();
Dialogs
When the link or image buttons are pressed in the toolbar we need to be able to ask the user for an image or an link. Per default there are two options.
If Bootstrap is loaded you can use it to show the dialogs. Simply add (or customize) the following HTML:
<div class="modal fade" id="editor-imageDialog">
<div class="modal-dialog">
<div class="modal-content">
<div class="modal-header">
<button type="button" class="close" data-dismiss="modal" aria-label="Close"><span aria-hidden="true">×</span></button>
<h4 class="modal-title">Image selection</h4>
</div>
<div class="modal-body">
<div>
Image URL<br />
<input type="text" name="imageUrl" /><br />
</div>
<div>
Caption<br />
<input type="text" name="imageCaption" /><br />
</div>
</div>
<div class="modal-footer">
<button type="button" class="btn btn-default" data-dismiss="modal">Cancel</button>
<button type="button" class="btn btn-primary" data-success="true">Add</button>
</div>
</div>
</div>
</div>
<div class="modal fade" id="editor-linkDialog">
<div class="modal-dialog">
<div class="modal-content">
<div class="modal-header">
<button type="button" class="close" data-dismiss="modal" aria-label="Close"><span aria-hidden="true">×</span></button>
<h4 class="modal-title">Link dialog</h4>
</div>
<div class="modal-body">
<div>
URL<br />
<input type="text" name="linkUrl" /><br />
</div>
<div>
Link text<br />
<input type="text" name="linkText" /><br />
</div>
</div>
<div class="modal-footer">
<button type="button" class="btn btn-default" data-dismiss="modal">Cancel</button>
<button type="button" class="btn btn-primary" data-success="true">Add</button>
</div>
</div>
</div>
</div>They will be found by the library since they use the container div ID (“editor”) as prefix for their IDs. The only thing that you can’t change is the names of the form elements and that the “Add” buttons have an attribute named data-success="true".
To completely customize the dialogs you can specify your own dialog provider like this:
var customDialogs = {
    image: function (context, callback) {
        //show your image dialog here.

        //once the dialog closes (and an image have been selected).
        callback({
            href: url,
            title: "Enter title here"
        });
    },
    link: function (context, callback) {
        //show your link dialog here.

        //once the dialog closes (and an image have been selected).
        callback({
            url: url,
            text: "Enter title here"
        });
    }
};

var editor = new Griffin.Editor('editor', markedAdapter );

//assign our custom provider
editor.dialogProvider = customDialogs;
Summary
Everything is documented in the TypeScript file. Read it to understand what each adapter get for information etc.
Some things have not been migrated yet, like autogrowing (instead of showing scrollbars) and the toolbar do currently not work in IE (will try to fix it ASAP).
- The project can be found at github.
| Reference: | Griffin Editor – A Markdown editor written in TypeScript. from our NCG partner Jonas Gauffin at the jgauffin’s coding den blog. |