Since DataAnnotations were introduced, developers found an easy way for setting up their database (especially those who use Code First development) while adding at the same time validation logic to their domain objects. In the Web API side, when an object is posted to one of it’s actions, you can check if the object posted is valid with something like this..
if (!ModelState.IsValid)
    {
        return BadRequest(ModelState);
    }
else
    {
    //
}
While all these sounds great, what happens when you have to add custom validation to your objects? What happens, if you want a User object posted with a FirstName property to be marked as Invalid when it’s first letter is not capital? Can you do this with Attributes? This very question reveals the real problem here, that is it’s not your domain models that needs to be validated but the ViewModel, the one that is transferred between the client and the server. Some times, your ViewModel objects may be the same with your domain objects which is something I always try to avoid. Anyway, I thought it would be good to post about this and make things a little bit clearer for those who are confused.
A clean solution to this problem is to split the logic where you define your database configuration (with DataAnnotation attributes or not) and the logic that validates your ViewModel objects. Here’s what we ‘re gonna see on this post:
- Set up the database (Code First development)
- Add database configuration using Fluent API
- Add custom validation configuration using FluentValidation
For this solution I chose on purpose not to use custom ViewModel objects so that you can see that model validation can be much more things than database configuration. Let’s start.
I created a new black solution in VS 2013 and added three projects:
- Domain (Class Library)
- Data Access (Class Library)
- Web API Empty Web Application with MVC / Web API templates checked
Suppose that we want to create a Registration form so that user can sign up to our application. Starting from the Domain class library project add the following classes.
User.cs
public class User
    {
        public int ID { get; set; }

        public string FirstName { get; set; }

        public string LastName { get; set; }

        public string Username { get; set; }

        public string Password { get; set; }

        public string BirthDate { get; set; }

        public string EmailAddress { get; set; }

        // Relationship with custom Foreign Key name
        public Gender Sex { get; set; }
        public int SexID { get; set; }
    }
Gender.cs
public class Gender
    {
        public int ID { get; set; }
        public string Name { get; set; }

        public List<User> Users { get; set; }
    }
You can see that I have defined a Gender class which is going to hold only two records, one for Male and another one for Female users. There will be a One to Many relationship between them (not defined yet) and we will declare that SexID will be the User’s foreign key to Gender table.
Switch to the DataAccess project and install Entity Framework using Nuget Packages. Also make sure you add reference to the Domain project. First of all, we need to introduce the Entity Framework our classes. Add a UsersContext class as follow:
public class UsersContext : DbContext
    {
        public DbSet<User> Users { get; set; }
        public DbSet<Gender> Genders { get; set; }
    }
To setup Dababase configurations you have two options. The one is to use DataAnnotations and the other is to use Fluent API. I prefer the latter cause I like to keep my domain objects clean. I usually add a “Configurations” folder in the project and setup a specific configuration for each of my domain objects. Do this and add two classes that inherits the EntityTypeConfiguration class as follow:
UserConfiguration.cs
public class UserConfiguration : EntityTypeConfiguration<User>
    {
        public UserConfiguration()
        {
            HasKey(u => u.ID);

            Property(u => u.ID).HasColumnName("UserID");
            Property(u => u.FirstName).IsRequired().HasMaxLength(50);
            Property(u => u.LastName).IsRequired().HasMaxLength(50);
            Property(u => u.Username).IsRequired().HasMaxLength(100);
            Property(u => u.BirthDate).IsRequired().HasMaxLength(20);
            Property(u => u.EmailAddress).IsRequired().HasMaxLength(100);

            // Our custom foreign key
            HasRequired(u => u.Sex).WithMany(s => s.Users).HasForeignKey(u => u.SexID);
        }
    }
GenderConfiguration.cs
public class GenderConfiguration : EntityTypeConfiguration<Gender>
    {
        public GenderConfiguration()
        {
            HasKey(g => g.ID);

            // We will set ID values manually
            Property(g => g.ID).HasDatabaseGeneratedOption(DatabaseGeneratedOption.None);
        }
    }
As you can see these are basic database configurations that will have impact in the way Entity Framework Code First will set the database for us. You need to add those two configurations in the UsersContext class:
public class UsersContext : DbContext
    {

        protected override void OnModelCreating(DbModelBuilder modelBuilder)
        {
            modelBuilder.Configurations.Add(new UserConfiguration());
            modelBuilder.Configurations.Add(new GenderConfiguration());
            base.OnModelCreating(modelBuilder);
        }

        public DbSet<User> Users { get; set; }
        public DbSet<Gender> Genders { get; set; }
    }
While at the same project, you need to set an initializer class that will always re-create our database, seeding two records for the Gender table. On production projects you will propably need migration logic but this is enough for this post.
DbInitializer.cs
public class DbInitializer : DropCreateDatabaseAlways<UsersContext>
    {
        protected override void Seed(UsersContext context)
        {
            GetGenders().ForEach(g => context.Genders.Add(g));
        }

        private static List<Gender> GetGenders()
        {
            return new List<Gender>
            {
                new Gender {
                    ID = 1,
                    Name = "Male"
                },
                new Gender {
                    ID = 2,
                    Name = "Female"
                }
            };
        }
    }
Now switch to the WebAPI project and for start install Entity Framework through Nuget Packages. Then add references to both of the class library projects. Open Global.asax.cs and add the following line into the Application_Start method, in order to set our database initializer.
void Application_Start(object sender, EventArgs e)
        {
            // Code that runs on application startup
            AreaRegistration.RegisterAllAreas();
            GlobalConfiguration.Configure(WebApiConfig.Register);
            RouteConfig.RegisterRoutes(RouteTable.Routes);

            // Initialize the users database.
            Database.SetInitializer(new DbInitializer());
        }
Adding a connectionString element in to the Web.config file and declare where the database will be created.
<connectionStrings>
    <add name="UsersContext" providerName="System.Data.SqlClient" connectionString="Server=(localdb)\v11.0; Database=UsersDB; Trusted_Connection=true"/>
  </connectionStrings>
Add a new Web API Controller class named UsersController for retrieving and posting User objects. As soon as we invoke one of this controller actions, our database will be created.
UsersController.cs
public class UsersController : ApiController
    {
        private UsersContext db = new UsersContext();

        // GET: api/Users
        public IQueryable<User> GetUsers()
        {
             return db.Users;
        }

        // GET: api/Users/5
        [ResponseType(typeof(User))]
        public async Task<IHttpActionResult> GetUser(int id)
        {
            User user = await db.Users.FindAsync(id);
            if (user == null)
            {
                return NotFound();
            }

            return Ok(user);
        }

        // POST: api/Users
        [ResponseType(typeof(User))]
        public async Task<IHttpActionResult> PostUser(User user)
        {
            if (!ModelState.IsValid)
            {
                return BadRequest(ModelState);
            }
            else
            {
                try
                {
                    db.Users.Add(user);
                    await db.SaveChangesAsync();
                }
                catch (Exception ex)
                {
                    // Log
                }
                return CreatedAtRoute("DefaultApi", new { id = user.ID }, user);
            }
        }

        protected override void Dispose(bool disposing)
        {
            if (disposing)
            {
                db.Dispose();
            }
            base.Dispose(disposing);
        }

        private bool UserExists(int id)
        {
            return db.Users.Count(e => e.ID == id) > 0;
        }
    }
Before starting your application you may have to set System.Web.Mvc reference, Copy Local property to True, from the properties window.
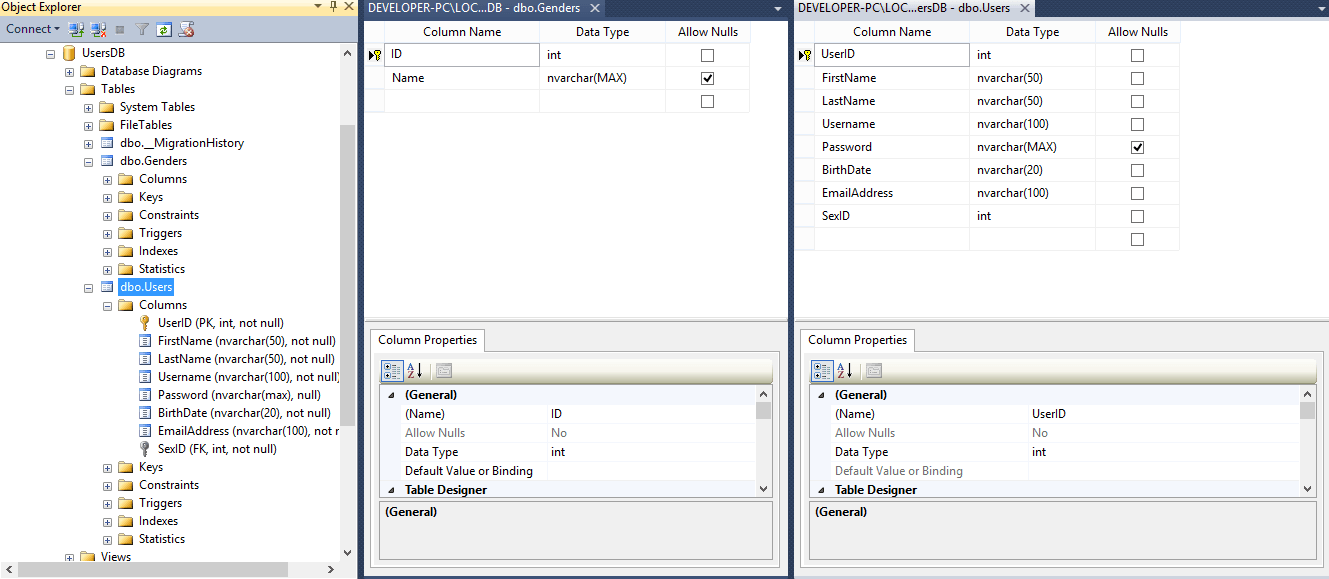
Fire your application and invoke /api/users action through your browser. You should see the UsersDB database in your local server as follow:
If you get any errors never mind, you can download this solution from the bottom of this post. We started this post to set custom validations to our object without affecting our database configurations. To check this, create an MVC Controller named HomeController with an Index method.
public class HomeController : Controller
    {
        // GET: Home
        public ActionResult Index()
        {
            return View();
        }
    }
Right click inside the View and select Add view. This will create an Index.cshtml file. I prefer not to paste all of it’s code here since it’s quite big. I will explain though what I did and what I am posting from this page. You can create your own implementation for this or just open the attached solution at the bottom of this post. I have created a registration form using AngularJS and Bootstrap which simply posts form values to our UsersController post method.
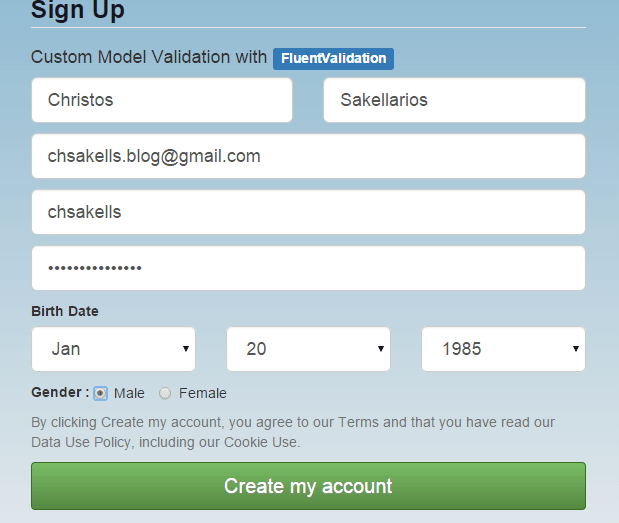
If you write your own implementation just make sure on Create my Account button click event, to post all form values without running any javascript validation. Here is the AngularJS function running when the button is clicked.
$scope.registerUser = function () {

                $scope.modelSubmitted = false;

                var newUser = {
                    FirstName: $scope.firstName,
                    LastName: $scope.lastName,
                    Username: $scope.userName,
                    Password: $scope.password,
                    BirthDate: $scope.birthMonth + '/' + $scope.birthDay + '/' + $scope.birthYear,
                    EmailAddress: $scope.emailAddress,
                    SexID: $scope.sex
                };

                $http.post(apiUrl, newUser)
                    .success(function (data, status, headers, config) {
                        $scope.newUserLocation = headers('Location');
                        $scope.hasModelErrors = false;
                        $scope.modelSubmitted = true;

                        // reset $scope values
                        $scope.firstName = '';
                        $scope.lastName = '';
                        $scope.userName = '';
                        $scope.password = '';
                        $scope.birthMonth = '01';
                        $scope.birthDay = 1;
                        $scope.birthYear = 1985;
                        $scope.emailAddress = '';
                    })
                    .error(function (error) {
                        console.log(error);
                        $scope.error = JSON.stringify(error.ModelState);
                        $scope.hasModelErrors = true;
                    }).finally(function () {
                    });

            }
It’s time to setup the Validation logic. We saw that the User.Username property has been created from Code First configuration as an [nvarchar(100), not null] property in the database. Hence, if the user selects a username with inapropriate or offensive words, the username of course will be valid and the stored in the database.
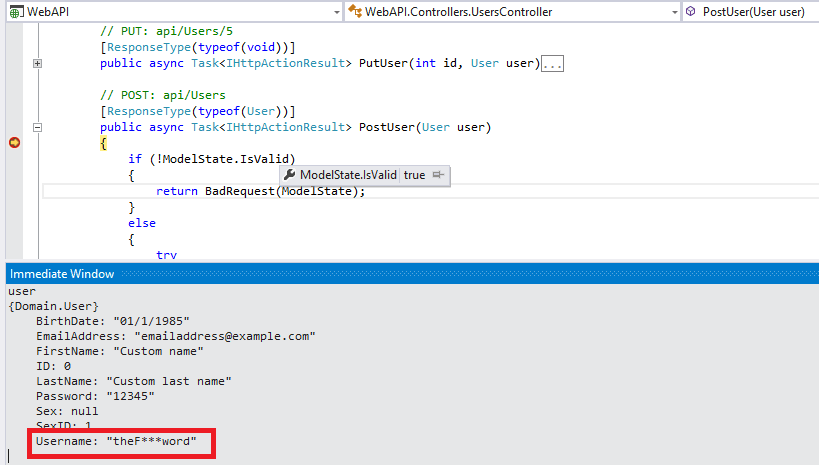
What we want to do is to add validation logic so that if certain words found on the usename property, automatically mark the ModelState as invalid. This can be done using the FluentValidation. You can see that we try to inject a model validation logic that has nothing to do with database table properties. Switch to the Domain class library and add a new folder named Validations. Install the FluentValidation package running the following command:
Install-package FluentValidation
Add a UserValidator class that inherits the AbstractValidator class.
UserValidator.cs
public UserValidator()
{
RuleFor(user => user.FirstName)
.Length(10, 50)
.WithMessage("First name must be between 10 to 50 characters.");
RuleFor(user => user.FirstName)
.Must(HasNotDigits)
.WithMessage("First name cannot contain digits");
RuleFor(user => user.SexID)
.NotEqual(0)
.WithMessage("Please select a Gender");
RuleFor(user => user.Username).NotNull().WithMessage("Username cannot be null");
RuleFor(user => user.FirstName).NotNull().WithMessage("First Name cannot be null");
RuleFor(user => user.Username)
.Must(NotOffensive)
.WithMessage("Username has invalid keywords. Try another one.");
RuleFor(user => user.EmailAddress).EmailAddress();
}
private bool HasNotDigits(string name)
{
if (!string.IsNullOrEmpty(name))
return !name.Any(char.IsDigit);
else return true;
}
private bool NotOffensive(string username)
{
if (!string.IsNullOrEmpty(username))
{
bool isOffensive = InvalidKeywords.Contains(username.ToLower());
return !isOffensive;
}
else return true;
}
// Pool from Database..
private static List<string> InvalidKeywords = new List<string>()
{
"thef***word",
"keyword_02",
"keyword_03",
"keyword_04"
};
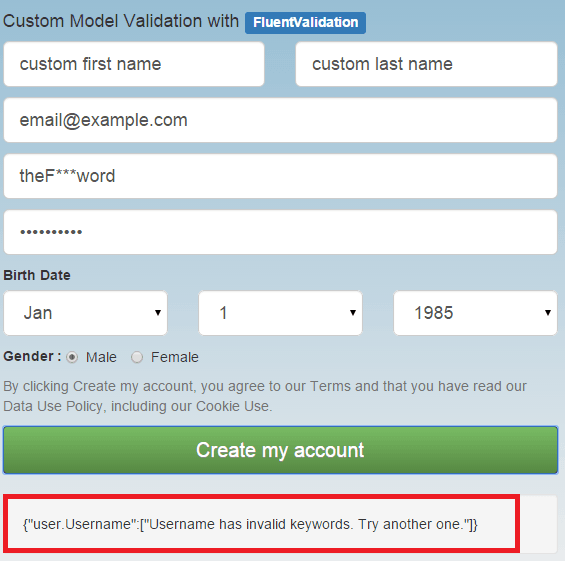
}I have highlighted only the validations added for the username. I added some more for other properties so you can study them later. I declared a Rule for the username property which says that userame must not be offensive and if so, return the relative message. You need to attach the validation configuration to the specific object you want to validate, that is the User class. This is the updated version.
public class User : IValidatableObject
    {
        public int ID { get; set; }

        public string FirstName { get; set; }

        public string LastName { get; set; }

        public string Username { get; set; }

        public string Password { get; set; }

        public string BirthDate { get; set; }

        public string EmailAddress { get; set; }

        // Relationship with custom Foreign Key name
        public Gender Sex { get; set; }
        public int SexID { get; set; }

        public IEnumerable<ValidationResult> Validate(ValidationContext validationContext)
        {
            var validator = new UserValidator();
            var result = validator.Validate(this);
            return result.Errors.Select(item => new ValidationResult(item.ErrorMessage, new[] { item.PropertyName }));
        }
    }
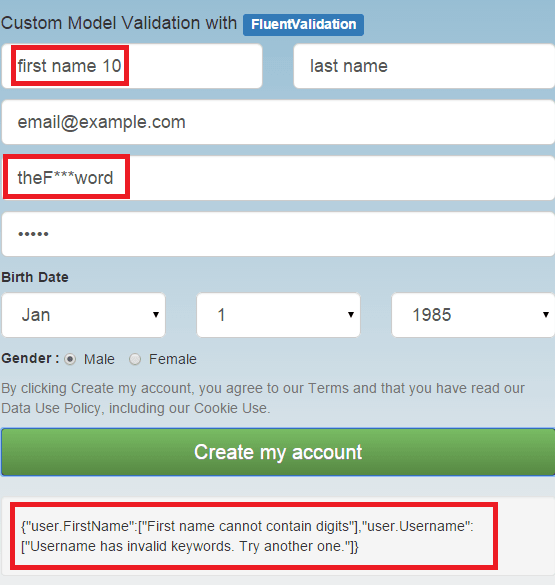
You can see how many we can achive using FluentValidation. In the solution you will find that I defined that First name cannot contain Digits and if so return an appropriate message.
RuleFor(user => user.FirstName)
                .Must(HasNotDigits)
                .WithMessage("First name cannot contain digits");

private bool HasNotDigits(string name)
        {
            if (!string.IsNullOrEmpty(name))
                return !name.Any(char.IsDigit);
            else return true;
        }
Food for thought
The reason I decided not to use custom ViewModel objects is to highlight the opposite: That is validation logic shouln’t necessary depent (only) on domain/entity objects but also in custom ViewModel objects. You can create custom lightweighted ViewModel classes for exchanging data between client and server and only if their ModelState is valid procceed to further processing. This way you prevent useless interaction with your database repository.
What comes next
In the next two 2 posts we will see how to create a full functional SPA application using AngularJS and pure Web API. Make sure you follow this blog in order to get notified when this occurs!
- You can download the project we built from here.


| Reference: | Web API powerful Custom Model Validation with FluentValidation from our NCG partner Christos Sakellarios at the chsakell’s Blog blog. |