Either you are a Back-end Web developer or a Front-end one, you must have realized that there are some frameworks and tools that have gained the poll position in Web application development. Which are these? Go ahead, search and download a client-side library, plugin or package. It’s 100% percentage sure, that you will be prompted to run one of the following commands.
npm install --package
bower install --package
If you haven’t heard of those terms yet or you have but don’t know exactly how to use them, that’s OK, this is what we are gonna see on this post. Beside Bower and NPM there two more players that are getting hotter nowadays. These are the Gulp build system and the Typescript. The former is perfectly bound to npm and bower allowing to create and automate tasks that are processing downloaded packages or custom CSS and JavaScript files. The latter seemed to got even more famous with the Angular 2 release whitch is known to be built in Typescript. Moreover, we are really happy that all those amazing tools are integrated in Visual Studio 2015 edition. So, let’s see now what we are going to do on this post.
We are going to create a Single Page Application using AngularJS and Typescript. We will use Bower and NPM to install or download all the plugins and packages required for the application. We will use Gulp to process all the JavaScript and CSS files required to run on the client side. We ‘ll do all these using Visual Studio 2015 edition so in case you haven’t already installed it, go ahead and do it here. The intent of this app is to simulate chsakell’s Blog Recent Posts section.
Prerequisites
We ‘ll take a step back before start building our application in order to install all the pre-mentioned tools for two reasons. The first one is that you will find many projects on the internet that use those tools but aren’t developed in Visual Studio. Hence, you need to know how to kick of those projects. The second reason is that I want us to run the custom commands that Visual Studio runs behind the scenes when using NPM, Bower and Gulp in the application we are going to build. Let’s start:
NPM

So what exactly is NPM? NPM is the Node.js Package Manager. In other words, NPM is to Node.js what Nuget Package Manager is to Visual Studio. And what is a Package Manager? A Package Manager is responsible to automate the installation and tracking of external packages. It can locate an online package, select and install a specific version. In order to install NPM you need to install Node.js so go ahead to its official website and install it here. After installing Node.js type the following command in console and ensure that you have NPM installed as well.
Check NPM version
npm -v
Bower

Bower is another Package Manager for the Web and as it’s official website says, Bower is optimized for the front-end. You will probably wonder.. wait a minute, you said NPM is also a Package Manager, so when do I know which one to use? Well, the answer is pretty much simple. You use NPM for installing packages that run on the server side and Bower for packages that will eventually run on the client. Let’s explain it with an example. The application we are going to build, requires
bootstrap and angularJS. Since those packages are going to be rendered on the client, we will download them using Bower. Yet, before those JavaScript and CSS files sent to client’s browser, we need to process them using Gulp. The processing will be done on the server side of course and hence, Gulp and all the relative plugins we ‘ll use to pre-process files are going to be downloaded through NPM. You can install Bower using the NPM by typing the following command in the console:
Installs Bower globally
npm install -g bower
Gulp

Gulp is a task runner that uses Node.js and works in a Streamline way. The main differences with it’s competitor Grunt, is that Gulp is code and stream based while Grunt is configuration and file based. You can think Gulp as a pipe, where you input some source files and at the end of the pipe you expect an output. For example, assuming that you have 5 custom JavaScript files that you want to be rendered on a page. You want to ensure that there is no compile error in your JavaScript, then you want to remove any comments or white spaces exist on those files and finally, concatenate those files to one single file. You can do all these stuff by creating a single Gulp task.

Install Gulp globally by typing the following command in console.
installs Gulp globally
npm install -g gulp
Typescript

Typescript is the famous superset of JavaScript that compiles to plain JavaScript. Its main features are that it is strongly typed and provides class-based object-orientation. This open-source programming language, helps you build better code by type checking the code during development providing developers with powerfull refactoring features. Typescript comes out of the box with Visual Studio 2013 Update 2 and of course Visual Studio 2015. We will install it though globally through NPM by typing the following command in console.
installs typescript globally
npm install -g typescript
If you are about to code in Typescript without using any external library, you are good to go. All you need to do is create a Typescript file and start coding. You can read more about Typescript on its official page here. If you need to use an external library such as angularJS then you have to install-download the respective Typescript Definition File. Typescript Definition files have the extension .d.ts and describe the types defined in an external library. They are only used during development, not in deployment. You can find such files in a specific repository named DefinitelyTyped here. You can download and use a specific Typescript Definition file using the Typescript Definition Manager (yup.. another package manager..). This package manager locates and installs d.ts directly from the DefinitelyTyped repository. Install it by typing the following command in console.
installs Typescript Definition Manager
npm install tsd -g
Two last things I would recommend you to install are Web Essentians for Visual Studio and Git. Web Essentians provides you with many features when writting CSS, JavaScript, TypeScript and so on.. You can install it from here.
Start Coding!
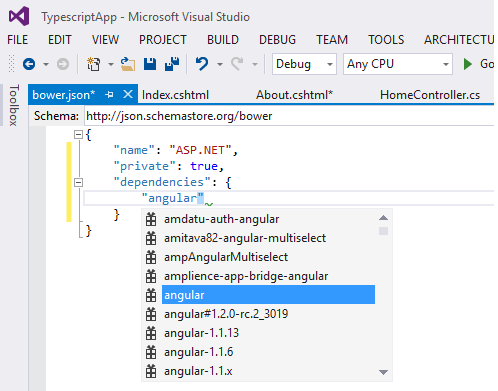
Open Visual Studio 2015 and create an Empty ASP.NET Web Application having the Web API and MVC checkboxes checked. Add a new MVC Controller named HomeController in the Controllers folder and create (if not exists) and Index action with the respective Views/Home/Index.cshtml view. The first thing we will do, is set Bower and download all the required Web dependencies that our SPA requires to run. Those dependencies are the JavaScript and CSS libraries that will be rendered on the client. Right click on the project and select New item…. Then search for Bower and select the Bower Configuration File. Leaving the default name as it is will add the following Bower.json configuration file at the root of application’s directory.
default bower.json file
{
   "name": "ASP.NET",
   "private": true,
   "dependencies": {
     }
}
There are many attributes that you can set in this .json file but we will only use the dependencies value to download the required libraries. Let’s start by installing angularJS. Change the bower.json as follow.
{
   "name": "ASP.NET",
   "private": true,
    "dependencies": {
      "angular": "1.4.5"
     }
}
Notice that by the time you start typing the dependency you want to download, you have auto-complete intellisense experience. This helps a lot tracking the required dependency.
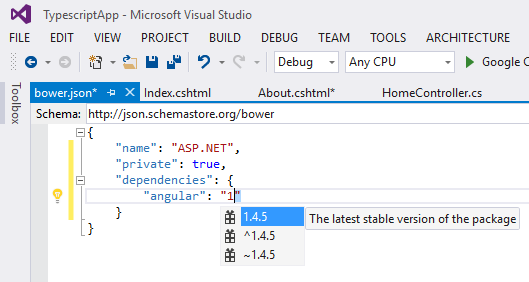
When you save the bower.json file the magic will happen. Visual Studio will download angularJS files. You will notice that VS downloads the dependencies in a root/lib directory by default.
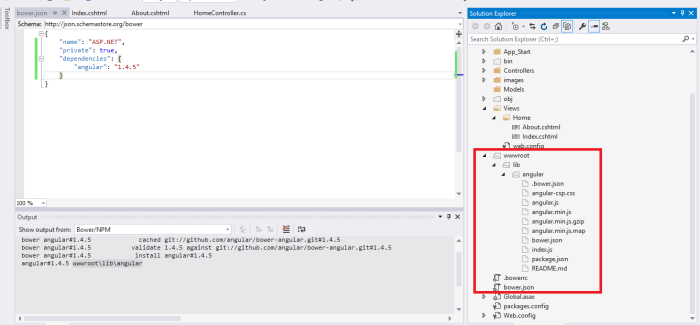
This directory is defined in the .bowerrc file. Now, if you are already familiar with Bower you would know that by default the depenencies are downloaded in a bower_components directory. The truth is that I’m kind of used with that behavior so go ahead and change the .bowerrc file as follow.
.bowerrc
{
    "directory": "bower_components"
}
Remove the wwwroot/lib folder from your solution, just edit the bower.json file (add a comment for example) and save again. This time Visual Studio will download angularJS in a bower_components folder. Let’s see what exactly Visual Studio does behind the scenes. Our application needs the angular-route module as well so let’s install it by typing the bower commands ourselfs this time. Open a terminal as administrator and switch to our application’s root folder. Type the following command:
installing angular-route with bower
bower install --save angular-route
The command will update the bower.json file by adding the required dependency. It will also download the angular-route module inside the bower_components folder. Let’s see the complete bower.json file.
bower.json
{
"name": "ASP.NET",
"private": true,
"dependencies": {
"angular": "1.4.5",
"angular-route": "~1.4.5",
"bootstrap": "3.3.5"
}
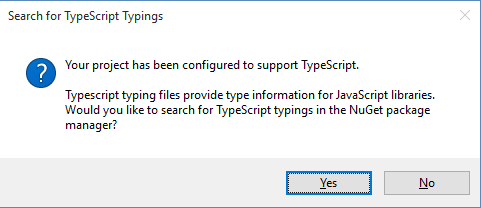
}Make sure you save the file and download all the required dependencies. Create an app folder in the root of your application and add inside it our first TypeScript file, named app.ts. Because of the fact app.ts is the first TypeScript file we added, Visual Studio will inform us that the project has been configured to support TypeScript and will suggest to search for typings from the Nuget package manager. Press NO, we will do it ourselves after we understand why we need to install them.
At the moment, if you try to create an angular module will will notice that TypeScript does not recognize the word angular and that’s because TypeScript doesn’t recognize external library types without their respective .d.ts files. Hence, since we haven’t installed the required TypeScript Definition Files for angularJS, angular is an unknown word to TypeScript.

You have two choices here. Either install those files using Nuget Package Manager which will download those files inside a Scripts/typings folder or use the Typescript Definition Manager we installed in previous step, and type the following command in the console, while at the root of the application.
installs angularjs TypeScript Definition Files
tsd install angular --resolve --save
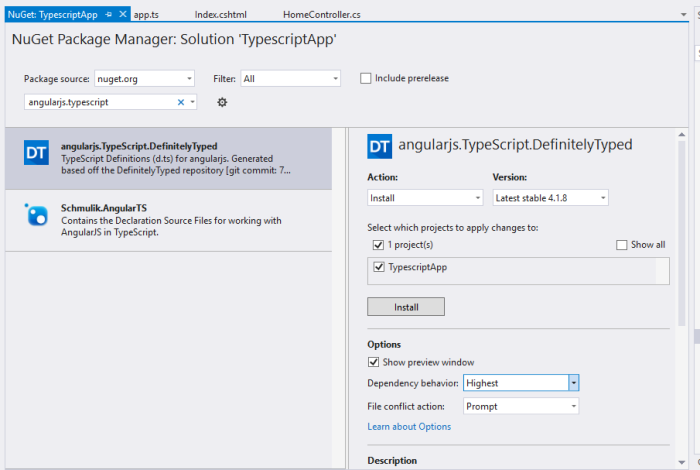
Notice that this time we don’t use the npm command but tsd in order to ask TypeScript Definition Manager to install the TypeScript Definition Files for angular. By passing –resolve and –save as parameters, TypeScript Definition Manager will resolve any dependencies that the angular definition files require and download them as well. The –save parameter will save the result in a tsd.d.ts file. This file contains the references path so that TypeScript can find the .d.ts files. Personally, I always prefer to install the TypeScript Definition Files using Nuget cause I have noticed some intellisense issues with the first one. Open Nuget Package Manager, search the term angularjs.typescript and install the respective package. This will also install jQuery relative TypeScript Definition Files since angular’s d.ts is depended on it (if prompted to install jQuery d.ts files click OK).
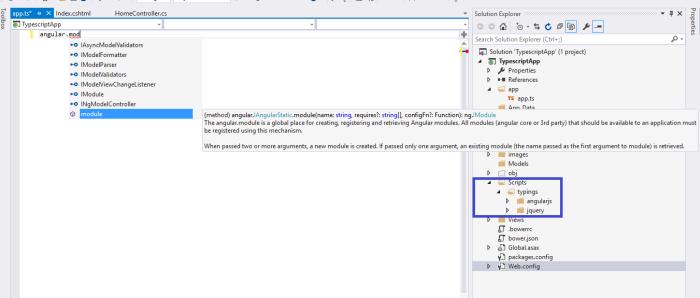
After installing the packages make sure the typings have been added in a Scripts/typings folder and TypeScript now recognizes angular.
We will proceed with defining our main angularJS module inside the app.ts TypeScript file. One important thing to remember when coding with TypeScript and angularJS is to always encapsulate your code in TypeScript modules. You will see that we are going to use Interfaces, Classes and many variables through our application and TypeScript modules will help us to encapsulate all of theses since TypeScript module can only access code within the same TypeScript module by default. In order to access an Interface or Class that belongs to a different TypeScript module you need to expose it using the export keyword. TypeScript module defines a unique namespace and since in angularJS is good practice to structure the spa by feature, guess what: we can also define a unique TypeScript module that actually encapsulates the angularJS components for a specific feature. In our application (which is quite small), we will define a top level module, the main module which we can call it app. For common services or directives we will have the TypeScript modules app.common.services and app.common.directives respectively. We only need to display, edit and add Posts in this application so we can create the relative TypeScript modules, app.PostList, app.PostEdit and app.PostAdd.
Another important thing you need to remember, is that by surrounding your code within a TypeScript module the resulted transpiled JavaScript code is contained in an IIFE (Immediately Invoked Function Expression). Let’s see the definition of our main module with the routing configuration as well.
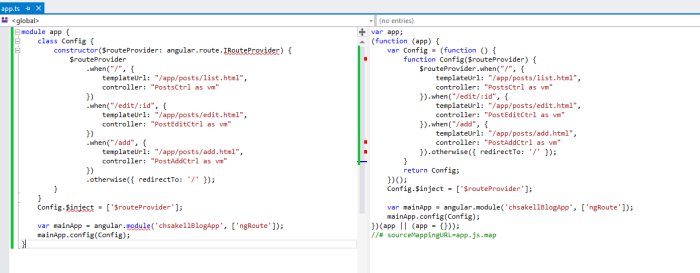
app.ts
module app {
    class Config {
        constructor($routeProvider: ng.route.IRouteProvider) {
            $routeProvider
                .when("/", {
                    templateUrl: "/app/posts/list.html",
                    controller: "PostsCtrl as vm"
                })
                .when("/edit/:id", {
                    templateUrl: "/app/posts/edit.html",
                    controller: "PostEditCtrl as vm"
                })
                .when("/add", {
                    templateUrl: "/app/posts/add.html",
                    controller: "PostAddCtrl as vm"
                })
                .otherwise({ redirectTo: '/' });
        }
    }
    Config.$inject = ['$routeProvider'];

    var mainApp = angular.module('chsakellBlogApp', ['ngRoute']);
    mainApp.config(Config);
}
We used a TypeScript class to define the routing configuration. In order to accomplish it, we injected the $routeProvider of type ng.route.IRouteProvider in its constructor (by the way, ng is another name for angular). In the same way we used to inject services on the function definition, we inject the services from the TypeScript Definition Files on the Class constructors. I would like to show you now how this file would transpile into pure JavaScript. As we have already mentioned, we use Visual Studio 2015 to build this app, but I used Visual Studio 2013 to take the following screenshot cause it has a preview for TypeScript files. Notice that our code was encapsulated in an IIFE.
Let’s proceed by defining the Post domain entity that we are going to use through the app. Add a domain folder under app and create the following TypeScript file named IEntity.ts.
app/domain/IEntity.ts
module app.domain {
    export interface IEntity { }

    export class EntityBase implements IEntity {
        constructor() { }
    }
}
We will enforce all of our domain objects to extend the app.domain.EntityBase class. We encapsulated the code in a new TypeScript module named app.domain and we declared an interface and a class that are going to be available outside this module, because we used the export keyword. Add the Post.ts file inside the app/domain folder as well.
Post.ts
module app.domain {
    export interface IPost {
        Id?: number;
        Title: string;
        Author: string;
        AuthorGravatar: string;
        URI: string;
        DatePublished: Date;
        ImageURI: string;
        Contents: string;
    }

    export class Post extends app.domain.EntityBase implements IPost {
        constructor(public Title: string,
            public Author: string,
            public AuthorGravatar: string,
            public URI: string,
            public DatePublished: Date,
            public ImageURI: string,
            public Contents: string,
            public Id?: number) {

            super();

            this.Id = Id;
            this.Title = Title;
            this.Author = Author;
            this.AuthorGravatar = AuthorGravatar;
            this.URI = URI;
            this.DatePublished = DatePublished;
            this.ImageURI = ImageURI;
            this.Contents = Contents;
        }
    }
}
By implementing an interface we force a class to define certain properties or functions. In the Post class, we used public properties in the constructor which automatically creates the relative properties. We will see different pattern on the controller classes. You may have noticed that a TypeScript module can split among different files. Let’s create the first service now. Create a new folder named common under app and add a new folder named services under common. Add the following constantService.ts TypeScript file.
app/common/services/constantService.ts
module app.common.services {

    interface IConstant {
        apiPostURI: string;
    }

    export class ConstantService implements IConstant {
        apiPostURI: string;

        constructor() {
            this.apiPostURI = '/api/posts/';
        }
    }

    angular.module('chsakellBlogApp')
        .service('constantService', ConstantService);
}
We created the ConstantService to define any constant api URIs to use across our application. You can see that we chose to create the property outside the constructor and that we only exposed the actual service, not the interface. The next would be to create a dataService able to communicate with a Web API backend infrastructure but since we haven’t create the latter yet, let’s do it now. Add the Post.cs file inside the Models folder.
Models/Post.cs
public class Post
    {
        #region Properties
        public int Id { get; set; }
        public string Title { get; set; }
        public string Author { get; set; }
        public string AuthorGravatar { get; set; }
        public string URI { get; set; }
        public DateTime DatePublished { get; set; }
        public string ImageURI { get; set; }
        public string Contents { get; set; }
        #endregion
    }
Normally, you would fetch data from a database but just for simplicity we will use some static data. Create an DataRepository class inside the App_Start folder as follow:
DataRepository.cs
public class DataRepository
{
public static List<Post> Posts = new List<Post>()
{
new Post() {
Id = 1,
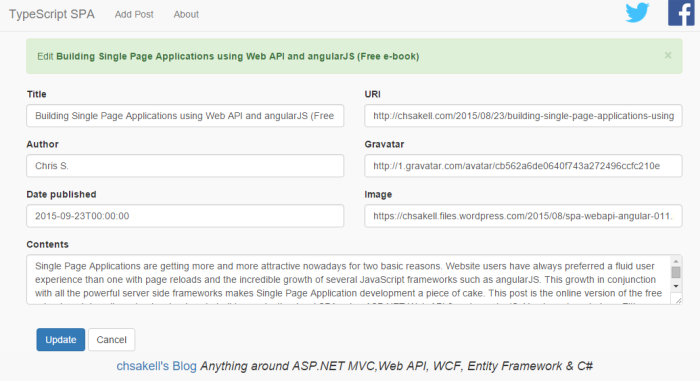
Title = "Building Single Page Applications using Web API and angularJS (Free e-book)",
Author = "Chris S.",
AuthorGravatar = "http://1.gravatar.com/avatar/cb562a6de0640f743a272496ccfc210e",
URI = "http://chsakell.com/2015/08/23/building-single-page-applications-using-web-api-and-angularjs-free-e-book/",
DatePublished = new DateTime(2015, 9, 23),
ImageURI = "https://chsakell.files.wordpress.com/2015/08/spa-webapi-angular-011.png",
Contents = "Single Page Applications are getting more and more attractive nowadays for two basic reasons. Website users have always preferred a fluid user experience than one with page reloads and the incredible growth of several JavaScript frameworks such as angularJS. This growth in conjunction with all the powerful server side frameworks makes Single Page Application development a piece of cake. This post is the online version of the free e-book and describes step by step how to build a production-level SPA using ASP.NET Web API 2 and angularJS. You have two choices. Either grab a coffee and keep going on with this version or simply download the e-book and enjoy it whenever and wherever you want."
},
new Post() {
Id = 2,
Title = "Dependency injection in WCF",
Author = "Chris S.",
AuthorGravatar = "http://1.gravatar.com/avatar/cb562a6de0640f743a272496ccfc210e",
URI = "http://chsakell.com/2015/07/04/dependency-injection-in-wcf/",
DatePublished = new DateTime(2015, 7, 4),
ImageURI = "https://chsakell.files.wordpress.com/2015/07/wcf-dependency-injection-03.png",
Contents = "Dependency injection is a software design pattern that implements inversion of control for resolving dependencies and is highly recommended for building scalable, testable and maintainable applications. In this very blog we have seen many times this pattern, mostly in ASP.NET MVC and ASP.NET Web API related posts where for example dependencies (data repositories or middle services) were injected into MVC constructors. We haven’t seen this pattern though in applications using the Windows Communication Framework. I decided to write this post cause I believe there many interesting things to cover when it comes to “marry” Dependency Injection and WCF. "
},
new Post() {
Id = 3,
Title = "ASP.NET Web API Unit Testing",
Author = "Chris S.",
AuthorGravatar = "http://1.gravatar.com/avatar/cb562a6de0640f743a272496ccfc210e",
URI = "http://chsakell.com/2015/05/10/asp-net-web-api-unit-testing/",
DatePublished = new DateTime(2015, 5, 10),
ImageURI = "https://chsakell.files.wordpress.com/2015/05/web-api-unit-testing.png",
Contents = "Unit testing can be beneficial to many aspects in software develepment, from the lowest level that is the source code to the highest level and the end user’s experience. Writing automated tests helps finding defects earlier in the development lifecycle process which leads to fewer late nights or weekend work (happier developers). Since defects are resolved before production, less defects reach end users (happier clients). It also increases reliability of source code, since if the base code doesn’t change all tests should always return the same results. Last but not least, anyone that decides to write unit tests is also forced to write testable code which leads to better software development practices."
},
new Post() {
Id = 4,
Title = "ASP.NET Web API feat. OData ",
Author = "Chris S.",
AuthorGravatar = "http://1.gravatar.com/avatar/cb562a6de0640f743a272496ccfc210e",
URI = "http://chsakell.com/2015/04/04/asp-net-web-api-feat-odata/",
DatePublished = new DateTime(2015, 4, 4),
ImageURI = "https://chsakell.files.wordpress.com/2015/04/webapi-odata-13.png",
Contents = "OData is an open standard protocol allowing the creation and consumption of queryable and interoperable RESTful APIs. It was initiated by Microsoft and it’s mostly known to .NET Developers from WCF Data Services. There are many other server platforms supporting OData services such as Node.js, PHP, Java and SQL Server Reporting Services. More over, Web API also supports OData and this post will show you how to integrate those two."
},
new Post() {
Id = 5,
Title = "ASP.NET MVC Solution Architecture – Best Practices",
Author = "Chris S.",
AuthorGravatar = "http://1.gravatar.com/avatar/cb562a6de0640f743a272496ccfc210e",
URI = "http://chsakell.com/2015/02/15/asp-net-mvc-solution-architecture-best-practices/",
DatePublished = new DateTime(2015, 2, 15),
ImageURI = "https://chsakell.files.wordpress.com/2015/02/mvc-architecture-01.png",
Contents = "Choosing the right architecture for Web Applications is a must, especially for large scale ones. Using the default Visual Studio ASP.NET MVC Web Application project templates, adding controllers with Scaffolding options, just to bootstrap your application and create pages and data in just a few minutes, sounds awesome for sure, but let’s be honest it’s not always the right choise. Peeking all the default options, keeping business, data and presentation logic in the same project will impact several factors in your solutions, such as scalability, usability or testability. In this post, will see how to keep things clean, creating a highly loosely coupled ASP.NET MVC Solution, where Data Access, Business and Presentation layers are defined in the right manner. "
}
};
}Create the Web API controller named PostsController.
PostsController
public class PostsController : ApiController
    {
        // GET api/posts
        public IHttpActionResult Get()
        {
            var posts = DataRepository.Posts;
            return Ok(posts);
        }

        // GET api/posts/5
        public IHttpActionResult Get(int id)
        {
            var post = DataRepository.Posts.FirstOrDefault(p => p.Id == id);

            if (post != null)
            {
                return Ok(post);
            }
            else
            {
                return NotFound();
            }
        }

        // POST api/posts
        public IHttpActionResult Post([FromBody]Post post)
        {
            var max = DataRepository.Posts.Max(p => p.Id);
            post.Id = max + 1;

            DataRepository.Posts.Add(post);
            return Ok(post);
        }

        // PUT api/posts/5
        public IHttpActionResult Put(int id, [FromBody]Post post)
        {
            Post _post = DataRepository.Posts.FirstOrDefault(p => p.Id == post.Id);

            if (_post != null)
            {
                for (int index = 0; index < DataRepository.Posts.Count; index++)
                {
                    if (DataRepository.Posts[index].Id == id)
                    {
                        DataRepository.Posts[index] = post;
                        return Ok();
                    }
                }
            }

            return NotFound();
        }

        // DELETE api/posts/5
        public IHttpActionResult Delete(int id)
        {
            if(DataRepository.Posts.Any(p => p.Id == id))
            {
                Post _post = DataRepository.Posts.First(p => p.Id == id);
                DataRepository.Posts.Remove(_post);

                return Ok();
            }

            return NotFound();
        }
    }
The controller implements the basic CRUD operations to be invoked from the anguralJS services. Let’s switch back to the front-end and create an angularJS service able to communicate with the server by sending HTTP requests. Add the following dataService.ts TypeScript file inside the common/services folder.
part of dataService.ts
module app.common.services {

    interface IDataService {
        get(resource: string): ng.IPromise<app.domain.EntityBase[]>;
    }

    export class DataService implements IDataService {

        private httpService: ng.IHttpService;
        private qService: ng.IQService;

        static $inject = ['$http', '$q'];
        constructor($http: ng.IHttpService, $q: ng.IQService) {
            this.httpService = $http;
            this.qService = $q;
        }

        get(resource: string): ng.IPromise<app.domain.EntityBase[]> {
            var self = this;

            var deferred = self.qService.defer();

            self.httpService.get(resource).then(function (result: any) {
                deferred.resolve(result.data);
            }, function (error) {
                deferred.reject(error);
            });

            return deferred.promise;
        }
    }

    angular.module('chsakellBlogApp')
        .service('dataService', DataService);
}
An interface declares the functionality you want to expose through the class that implements it. On purpose, I haven’t pasted all the code yet so that we can focus on the most important parts first. First thing to notice is that app.domain.EntityBase TypeScript class is accessible because we used the export keyword. The DataService is being injected with two familiar (I hope) services, $http and $q using the relative TypeScript Definitions ng.IHttpService and ng.IQService respectively. Here we can see for the first time the static injection pattern above the constructor declaration. We will follow this pattern in our controllers as well. Let’s see the full service implementation now.
dataService.ts
module app.common.services {

    interface IDataService {
        get(resource: string): ng.IPromise<app.domain.EntityBase[]>;
        getSingle(resource: string): ng.IPromise<app.domain.EntityBase>;
        add(resource: string, entity: app.domain.IEntity): ng.IPromise<app.domain.EntityBase>;
        update(resource: string, entity: app.domain.IEntity): ng.IPromise<app.domain.EntityBase>;
        remove(resource: string): ng.IPromise<any>;
    }

    export class DataService implements IDataService {

        private httpService: ng.IHttpService;
        private qService: ng.IQService;

        static $inject = ['$http', '$q'];
        constructor($http: ng.IHttpService, $q: ng.IQService) {
            this.httpService = $http;
            this.qService = $q;
        }

        get(resource: string): ng.IPromise<app.domain.EntityBase[]> {
            var self = this;

            var deferred = self.qService.defer();

            self.httpService.get(resource).then(function (result: any) {
                deferred.resolve(result.data);
            }, function (error) {
                deferred.reject(error);
            });

            return deferred.promise;
        }

        getSingle(resource: string): ng.IPromise<app.domain.EntityBase> {
            var self = this;

            var deferred = self.qService.defer();

            self.httpService.get(resource).then(function (result: any) {
                deferred.resolve(result.data);
            }, function (error) {
                deferred.reject(error);
            });

            return deferred.promise;
        }

        add(resource: string, entity: app.domain.IEntity): ng.IPromise<app.domain.EntityBase> {
            var self = this;
            var deferred = self.qService.defer();

            self.httpService.post(resource, entity)
                .then(function (result) {
                    deferred.resolve(result.data);
                }, function (error) {
                    deferred.reject(error);
                });

            return deferred.promise;
        }

        update(resource: string, entity: app.domain.IEntity): ng.IPromise<app.domain.EntityBase> {
            var self = this;
            var deferred = self.qService.defer();

            self.httpService.put(resource, entity)
                .then(function (data) {
                    deferred.resolve(data);
                }, function (error) {
                    deferred.reject(error);
                });

            return deferred.promise;
        }

        remove(resource: string): ng.IPromise<any> {
            var self = this;

            var deferred = self.qService.defer();

            self.httpService.delete(resource)
                .then(function (data) {
                    deferred.resolve(data);
                }, function (error) {
                    deferred.reject(error);
                });

            return deferred.promise;
        }
    }

    angular.module('chsakellBlogApp')
        .service('dataService', DataService);
}
As we mentioned, our SPA has only one feature, the Posts, so go ahead and add a new folder named posts under the app. As opposed from the app.ts the controller that displays the posts is named postsCtrl. Add the following TypeScript app/posts/postsCtrl.ts file.
postsCtrl.ts
module app.postList {

    interface IPostsViewModel {
        posts: app.domain.IPost[];
        remove(Id: number): void;
    }

    class PostsCtrl implements IPostsViewModel {

        posts: app.domain.IPost[];

        static $inject = ['constantService', 'dataService'];
        constructor(private constantService: app.common.services.ConstantService,
            private dataService: app.common.services.DataService) {
            this.getPosts();
        }

        remove(Id: number): void {
            var self = this; // Attention here.. check 'this' in TypeScript and JavaScript

            this.dataService.remove(this.constantService.apiPostURI + Id)
                .then(function (result) {
                    self.getPosts();
                });
        }

        getPosts(): void {
            this.dataService.get(this.constantService.apiPostURI).then((result: app.domain.IPost[]) => {
                this.posts = result;
            });
        }
    }
    angular.module('chsakellBlogApp')
        .controller('PostsCtrl', PostsCtrl);
}
Here we can see how we injected our custom services constantService and dataService to make the API calls. Any property you need to be exposed through your controller needs to be declared in the interface being implemented. Here we expose a posts property and a remove method. Let’s view the postAddCtrl controller. Create the following file inside the app/posts folder as well.
postAddCtrl.ts
module app.postAdd {

    interface IAddPostViewModel {
        post: app.domain.IPost;
        add(): void;
    }

    class PostAddCtrl implements IAddPostViewModel {

        post: app.domain.IPost;

        static $inject = ['$location', 'constantService', 'dataService'];
        constructor(private $location: ng.ILocationService,
            private constantService: app.common.services.ConstantService,
            private dataService: app.common.services.DataService) {
        }


        add(): void {
            this.dataService.add(this.constantService.apiPostURI, this.post)
                .then((result: app.domain.IPost) => {
                    alert(result.Title + ' submitted successfully');
                    this.$location.path('/');
                });
        }
    }
    angular.module('chsakellBlogApp')
        .controller('PostAddCtrl', PostAddCtrl);
}
The only new thing to notice here is the way we declared the success callback method we invoke after the post is submitted. We know that on success, we expect a result of type app.domain.IPost and hence we used it. I left the postEditCtrl controller last because it makes uses of an interesting service, the ng.route.IRouteParamsService. The controller needs this service in order to catch the parameter id when we routing to /edit/:id.
app/posts/postEditCtrl.ts
module app.postEdit {

    interface IEditPostViewModel {
        post: app.domain.IPost;
        update(): void;
    }

    interface IPostParams extends ng.route.IRouteParamsService {
        id: number;
    }

    class PostEditCtrl implements IEditPostViewModel {

        post: app.domain.IPost;
        private postId: number;

        static $inject = ['$routeParams', '$location', 'constantService', 'dataService'];
        constructor(private $routeParams: IPostParams,
            private $location: ng.ILocationService,
            private constantService: app.common.services.ConstantService,
            private dataService: app.common.services.DataService) {
            this.postId = $routeParams.id;

            dataService.getSingle(this.constantService.apiPostURI + this.postId)
                .then((result: app.domain.IPost) => {
                    this.post = result;
                });
        }

        update(): void {
            this.dataService.update(this.constantService.apiPostURI + this.postId, this.post)
                .then((result: app.domain.IPost) => {
                    this.$location.path('/');
                });
        }
    }
    angular.module('chsakellBlogApp')
        .controller('PostEditCtrl', PostEditCtrl);
}
The key to capture route params is to create an interface that extends the ng.route.IRouteParamsService service. Any additional route parameter you would like to be exposed by the route, needs to be declared in the IPostParams interface. Those controllers we created are bound to certain templates inside the app/posts/ folder. I don’t want to paste all the html code here so please get the following templates directly from Github. I have also created a site.css stylesheet file inside a Styles folder:
I will paste though the initial code for Views/Home/Index.cshtml page, which is the landing page that bootstraps our Single Page Application. The reason I want to paste the code is to remind you that we haven’t finished yet building our application. We want to process all the JavaScript and CSS files automatically with Gulp and not manually paste them as follow.
Views/Home/Index.cshtml
@{
    Layout = null;
}

<!DOCTYPE html>

<html ng-app="chsakellBlogApp">
<head>
    <meta name="viewport" content="width=device-width" />
    <title>Index</title>
    <link href="~/bower_components/bootstrap/dist/css/bootstrap.css" rel="stylesheet" />
    <link href="~/Styles/site.css" rel="stylesheet" />

    <script src="~/bower_components/jquery/dist/jquery.js"></script>
    <script src="~/bower_components/bootstrap/dist/js/bootstrap.js"></script>
    <script src="~/bower_components/angular/angular.js"></script>
    <script src="~/bower_components/angular-route/angular-route.js"></script>

    <script src="~/app/app.js"></script>
    <script src="~/app/domain/IEntity.js"></script>
    <script src="~/app/domain/Post.js"></script>
    <script src="~/app/common/services/constantService.js"></script>
    <script src="~/app/common/services/dataService.js"></script>
    <script src="~/app/posts/postsCtrl.js"></script>
    <script src="~/app/posts/postAddCtrl.js"></script>
    <script src="~/app/posts/postEditCtrl.js"></script>

</head>
<body>
    <div id="wrap">
        <div id="main" class="container">
            <div class="navbar navbar-default navbar-fixed-top">
                <div class="navbar-header">
                    <button type="button" class="navbar-toggle" data-toggle="collapse" data-target=".navbar-collapse">
                        <span class="icon-bar"></span>
                        <span class="icon-bar"></span>
                        <span class="icon-bar"></span>
                    </button>
                    <a class="navbar-brand active" href="#/">TypeScript SPA</a>
                </div>
                <div class="collapse navbar-collapse">
                    <ul class="nav navbar-nav">
                        <li><a href="#/add" class="active">Add Post<i class="fa fa-info-circle fa-fw pull-right"></i></a></li>
                        <li><a href="#/">About<i class="fa fa-info-circle fa-fw pull-right"></i></a></li>
                    </ul>
                    <ul class="nav navbar-nav navbar-right" ng-if="userData.isUserLoggedIn">
                        <li class="userinfo"><a href="#/">{{username}}<i class="fa fa-user fa-fw"></i></a></li>
                    </ul>
                    <a href="https://www.facebook.com/chsakells.blog" target="_blank" class="pull-right">
                        <img src="https://chsakell.files.wordpress.com/2015/08/facebook.png" />
                    </a>
                    <a href="https://twitter.com/chsakellsBlog" target="_blank" class="pull-right">
                        <img src="https://chsakell.files.wordpress.com/2015/08/twitter-small.png" />
                    </a>
                </div>
            </div>

            <ng-view></ng-view>
        </div>
    </div>
    <footer class="navbar navbar-fixed-bottom">
        <div class="text-center">
            <h4 class="white">
                <a href="http://chsakell.com/" target="_blank">chsakell's Blog</a>
                <i>Anything around ASP.NET MVC,Web API, WCF, Entity Framework & C#</i>
            </h4>
        </div>
    </footer>
</body>
</html>
When you drag a TypeScript file inside an html page, Visual Studio will adds the corresponding JavasScript transpiled file. If you wish you can build and run your application to check how it looks like.

Entering Gulp
Let’s take a look again the JavaScript references that our main page requires.
<link href="~/bower_components/bootstrap/dist/css/bootstrap.css" rel="stylesheet" />
    <link href="~/Styles/site.css" rel="stylesheet" />

    <script src="~/bower_components/jquery/dist/jquery.js"></script>
    <script src="~/bower_components/bootstrap/dist/js/bootstrap.js"></script>
    <script src="~/bower_components/angular/angular.js"></script>
    <script src="~/bower_components/angular-route/angular-route.js"></script>

    <script src="~/app/app.js"></script>
    <script src="~/app/domain/IEntity.js"></script>
    <script src="~/app/domain/Post.js"></script>
    <script src="~/app/common/services/constantService.js"></script>
    <script src="~/app/common/services/dataService.js"></script>
    <script src="~/app/posts/postsCtrl.js"></script>
    <script src="~/app/posts/postAddCtrl.js"></script>
    <script src="~/app/posts/postEditCtrl.js"></script>
I divided those references for a reason. In the way I see them, there are three types-groups of references to be injected in our page. The first one, is the CSS required styles, the second one is the External libraries JavaScript files and last but not least, the custom angularJS code typed in TypeScript. So I am thinking to create a specific Gulp task to run for each of those groups: Here’s the task’s description:
- Gather all required files
- Concatenate them into a single file
- Remove any comments or white spaces if possible
- Inject the resulted file in the appropriate position in the page
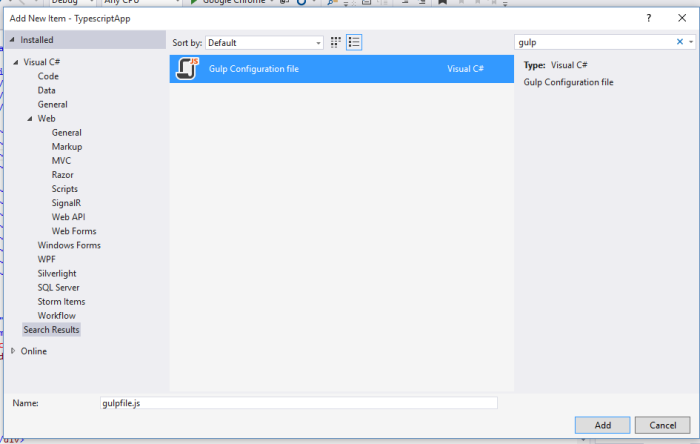
Is that possible? Of course it is, Gulp makes those type of tasks a piece of cake. To start with, add a gulpfile.js file at the root of your Web application. In Visual Studio 2015, you can do it by adding a Gulp Configuration file.
Here’s how the default gulpfile.js looks like.
gulpfile.js
/*
This file in the main entry point for defining Gulp tasks and using Gulp plugins.
Click here to learn more. http://go.microsoft.com/fwlink/?LinkId=518007
*/
var gulp = require('gulp');
gulp.task('default', function () {
// place code for your default task here
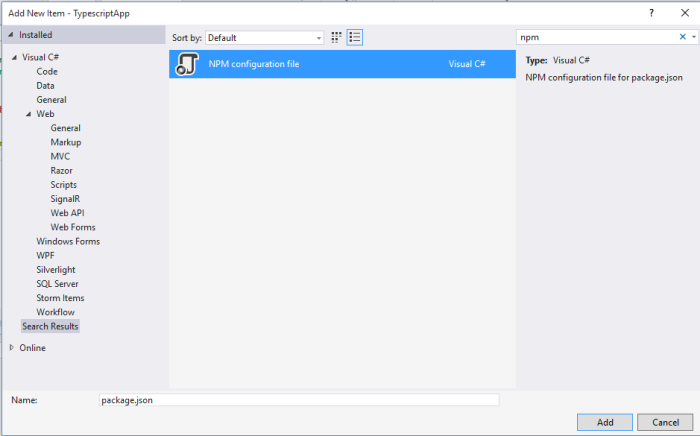
});We need to install Gulp before actually run a Gulp task so how we do it? Using NPM through Visual Studio. In the same way you created the gulpfile.js add a new NPM configuration file at the root of your application.
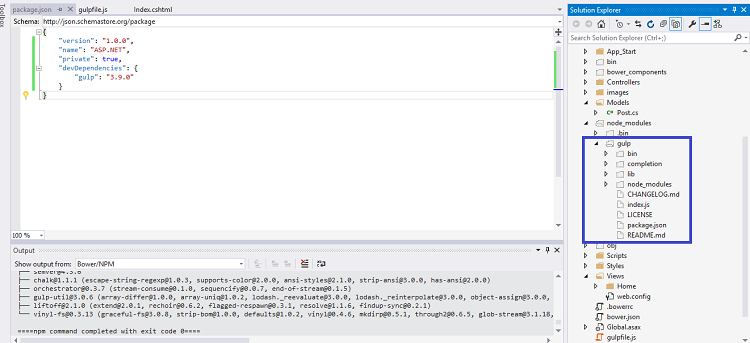
Change the package.json file created as follow:
package.json
{
    "version": "1.0.0",
    "name": "ASP.NET",
    "private": true,
    "devDependencies": {
        "gulp": "3.9.0"
    }
}
By the time you save the file, VS will download Gulp inside a node_modules/gulp folder.
In case you weren’t in Visual Studio IDE and you wanted to download the dependencies, all you had to do is open a console, navigate to application’s root folder where the package.json file exists, and type the following command:
npm install dependencies
npm install
Just to make sure Gulp has been setup correctly change the gulpfile.js file as follow and run the task through the Task Runner Explorer.
var gulp = require('gulp');

gulp.task('default', function () {
    console.log('Hello Gulp!');
});
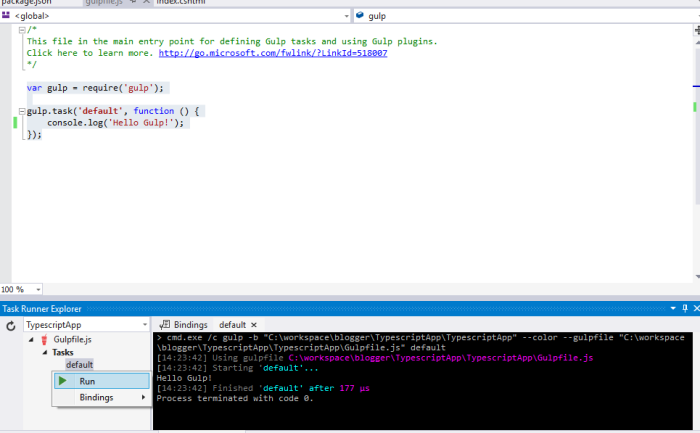
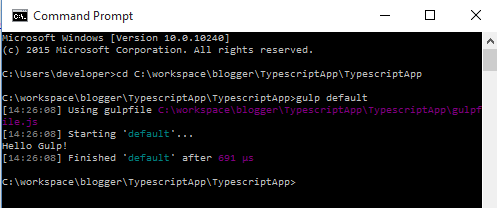
In case you wanted to run the default task outside Visual Studio you could type the following command in console, in the same way we did with NPM.
running Gulp task named default
gulp default
Both of those commands assume that you have NPM and Gulp installed as we described at the beginning of this post. We didn’t say anything about how Gulp works but we will after we create the first task. The first task is going to process the CSS files and finally inject the resulted file in the Index.cshtml page. Let’s view the task.
var gulp = require('gulp');
var inject = require('gulp-inject');
var concat = require('gulp-concat');
var print = require('gulp-print');

gulp.task('css-task', function () {
    var target = gulp.src('./views/home/index.cshtml');

    var customCssStream = gulp.src(['./bower_components/bootstrap/dist/css/bootstrap.min.css',
                                    './Styles/site.css']);

    return target
        .pipe(inject(
            customCssStream.pipe(print())
            .pipe(concat('appStyles.css'))
            .pipe(gulp.dest('.build/css')), { name: 'styles' })
            )
        .pipe(gulp.dest('./views/home/'));
});
I should have highlighted all the lines cause they all require explanations. First of all we create references to the Gulp-plugins that we are going to use. Those plugins must be installed via NPM as well (I will show you the updated package.json later). You create a task using the gulp.task API passing the name of the task and a function which defines what you want the task to do. You use the gulp.src API to define the source files to be contained into the stream. Here we used the bootstrap and the custom css file for our SPA. Next we created the actuall task to be executed. Despite the fact that it seems that the inject command is the first on the pipeline, what’s is inside it comes first. Hence, first we get the css files from the customCssStream and we print them. I added the printing so that you can see that you are processing the right files. Then we concatenate those two files by using the concat Gulp-plugin. The parameter declares the resulted file name. Next, we copy the appStyles.css file inside a .build/css folder using the gulp.dest command. Finally the resulted file is being injected into a region named styles that we defined in our Views/Home/Index.cshtml page, using the inject Gulp-plugin. For all this to work, first you need to install the required plugins using NPM.
package.json
{
    "version": "1.0.0",
    "name": "ASP.NET",
    "private": true,
    "devDependencies": {
        "gulp": "3.9.0",
        "gulp-concat": "2.6.0",
        "gulp-inject": "2.2.0",
        "gulp-print": "1.2.0"
    }
}
Add the region for CSS file to be injected into Index.cshtml
part of Index.cshtml
<!-- styles:css -->
<!-- endinject -->
When you run the task, the resulted file will be injected in the page as follow:
part of Index.cshtml
<!-- styles:css -->
<link rel="stylesheet" href="/.build/css/appStyles.css">
<!-- endinject -->
Of course, you can remove the CSS references we manually added before.

Let’s proceed with the vendor’s Gulp task.
vendors task
var gulp = require('gulp');
var inject = require('gulp-inject');
var concat = require('gulp-concat');
var print = require('gulp-print');
var angularFilesort = require('gulp-angular-filesort');

gulp.task('vendors-task', function () {
    var target = gulp.src('./views/home/index.cshtml');

    var vendorStream = gulp.src(['./bower_components/angular-route/angular-route.js',
                                 './bower_components/angular/angular.js',
                                 './bower_components/bootstrap/dist/js/bootstrap.js',
                                 './bower_components/jquery/dist/jquery.js']);

    return target
        .pipe(inject(
            vendorStream.pipe(print())
                        .pipe(angularFilesort())
                        .pipe(concat('vendors.js'))
                        .pipe(gulp.dest('.build/vendors')), { name: 'vendors' }))
        .pipe(gulp.dest('./views/home/'));
});
When coding in angularJS it’s very important to inject files in the right order. This is why we used a Gulp plugin named gulp-angular-filesort. In case you didn’t noticed, on purpose I declared the stream files in wrong order. Comment out the line that sorts the files and your application will break. Moreover, if you wish to see the order that Gulp injects the files, simply comment out the concatenate action. Now let’s see the changes in the package.json and Index.cshtml.
package.json
{
    "version": "1.0.0",
    "name": "ASP.NET",
    "private": true,
    "devDependencies": {
        "gulp": "3.9.0",
        "gulp-concat": "2.6.0",
        "gulp-uglify": "1.4.1",
        "gulp-inject": "2.2.0",
        "gulp-print": "1.2.0",
        "gulp-angular-filesort": "1.1.1"
    }
}
part of Index.cshtml
<!-- vendors:js -->
    <script src="/.build/vendors.js"></script>
<!-- endinject -->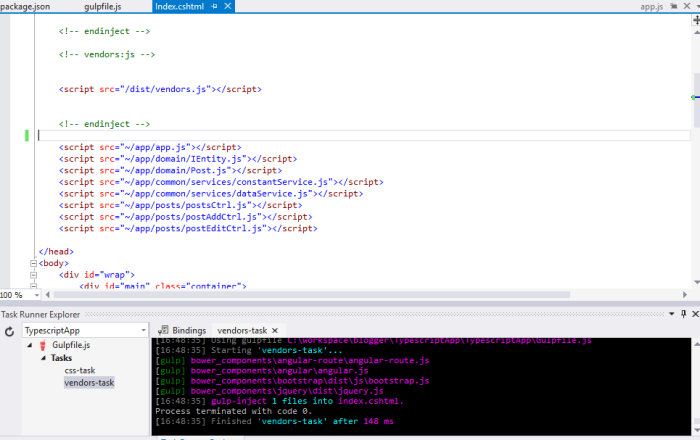
As you can see we installed the gulp-uglify plugin. We will use it in the last task for all of our custom JavaScript transpiled files.
var gulp = require('gulp');
var inject = require('gulp-inject');
var concat = require('gulp-concat');
var print = require('gulp-print');
var angularFilesort = require('gulp-angular-filesort');
var uglify = require('gulp-uglify');

gulp.task('spa-task', function () {
    var target = gulp.src('./views/home/index.cshtml');

    var appDomainStream = gulp.src(['./app/domain/*.js']);
    var appStream = gulp.src(['./app/*.js', './app/posts/*.js', './app/common/services/*.js']);

    return target
                .pipe(inject(appDomainStream
                        .pipe(print())
                        .pipe(concat('domain.js'))
                        .pipe(uglify())
                        .pipe(gulp.dest('.build/spa')), { name: 'domain' }))
                        .pipe(gulp.dest('./views/home/'))
                .pipe(inject(appStream
                        .pipe(print())
                        .pipe(concat('app.js'))
                        .pipe(uglify())
                        .pipe(gulp.dest('.build/spa')), { name: 'app' }))
                        .pipe(gulp.dest('./views/home/'))
});
<!-- domain:js -->
<script src="/.build/spa/domain.js"></script>
<!-- endinject -->
<!-- app:js -->
<script src="/.build/spa/app.js"></script>
<!-- endinject -->Be careful when you sorting files with Gulp cause not all files are taken into consideration. For example the domain JavaScript files don’t have any angularJS dependencies so if you try to sort them along with the appStream you may get an error. That’s why we used a different section to render the domain related files first.
That’s it, we finally finished! We have seen so many interesting things on this post but make no mistake: we have only scratched their surface. There are amazing things you can accomplish using those tools and I totally recommend you to study their APIs and plugins. I believe that now you shouldn’t have any problem to kick of any project that has used Bower, Gulp and NPM. You can download the project we built from here. When you open the solution for the first time in Visual Studio 2015, it will automatically detect and install any Bower and NPM dependencies. Build the solution to restore Nuget Packages and run the app!
| Reference: | TypeScript, AngularJS, Gulp and Bower in Visual Studio 2015 from our NCG partner Christos Sakellarios at the chsakell’s Blog blog. |