File uploading is one of the most common tasks all developers have to deal with, at some point of their application development cycle. For example, Web applications (such as social networks) usually require users to upload a profile picture during registration or in the case of desktop ones, users may required to upload private documents.
This post will show you how to upload multipart/form-data files using Web API with both Web and Desktop clients. More particular here’s what we gonna see:
- Web API File Upload Controller: Create an action for Uploading multipart-form data
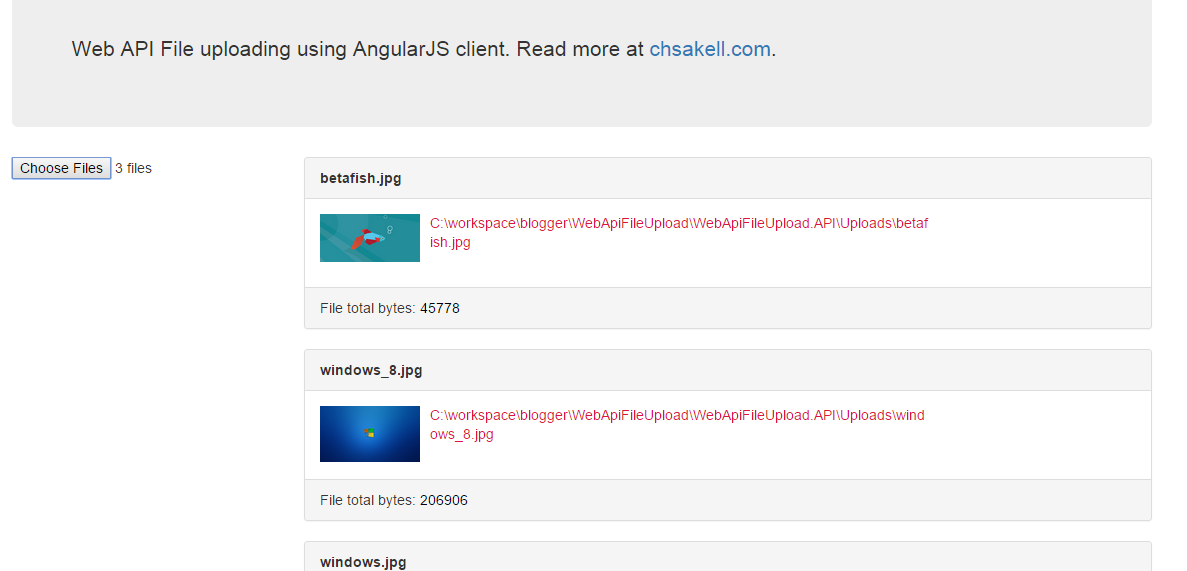
- Web client: Create an AngularJS web client to upload multiple files at once using the Angular File Upload module
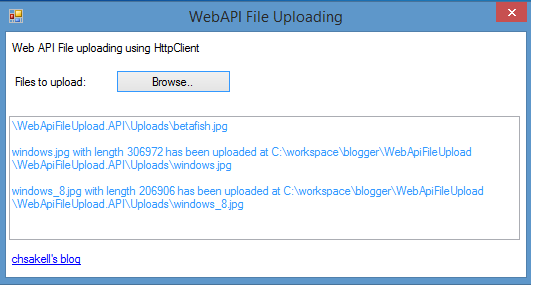
- Desktop client: Create an Windows Form client to upload multiple files using HttpClient
Let’s start:
The Controller
Create a solution named WebApiFileUpload and add a new empty Web Application named WebApiFileUpload.API selecting both the Web API and MVC checkboxes. Add a Web API Controller named FileUploadController. Before showing controller’s code let’s see what this controller requires:
- A FileUpload result: Custom result to return to clients
- A custom MultipartFormDataStreamProvider: The provider which will actually capture and save the uploaded file
- Allow only Mime-Multipart content to be uploaded:For this our best option is to create a Filter and apply it to the POST method
Create a Infrastructure folder inside the API project and add the following three classes that implement the above required behaviors.
FileUploadResult.cs
public class FileUploadResult
    {
        public string LocalFilePath { get; set; }
        public string FileName { get; set; }
        public long FileLength { get; set; }
    }
UploadMultipartFormProvider.cs
public class UploadMultipartFormProvider : MultipartFormDataStreamProvider
    {
        public UploadMultipartFormProvider(string rootPath) : base(rootPath) { }

        public override string GetLocalFileName(HttpContentHeaders headers)
        {
            if (headers != null &&
                headers.ContentDisposition != null)
            {
                return headers
                    .ContentDisposition
                    .FileName.TrimEnd('"').TrimStart('"');
            }

            return base.GetLocalFileName(headers);
        }
    }
MimeMultipart.cs
public class MimeMultipart : ActionFilterAttribute
    {
        public override void OnActionExecuting(HttpActionContext actionContext)
        {
            if (!actionContext.Request.Content.IsMimeMultipartContent())
            {
                throw new HttpResponseException(
                    new HttpResponseMessage(
                        HttpStatusCode.UnsupportedMediaType)
                );
            }
        }

        public override void OnActionExecuted(HttpActionExecutedContext actionExecutedContext)
        {

        }
    }
And now the controller:
FileUploadController.cs
public class FileUploadController : ApiController
    {
        [MimeMultipart]
        public async Task<FileUploadResult> Post()
        {
            var uploadPath = HttpContext.Current.Server.MapPath("~/Uploads");

            var multipartFormDataStreamProvider = new UploadMultipartFormProvider(uploadPath);

            // Read the MIME multipart asynchronously
            await Request.Content.ReadAsMultipartAsync(multipartFormDataStreamProvider);

            string _localFileName = multipartFormDataStreamProvider
                .FileData.Select(multiPartData => multiPartData.LocalFileName).FirstOrDefault();

            // Create response
            return new FileUploadResult
            {
                LocalFilePath = _localFileName,

                FileName = Path.GetFileName(_localFileName),

                FileLength = new FileInfo(_localFileName).Length
            };
        }
    }
Make sure you create a folder named Uploads inside the project cause this is where the uploaded files will be saved. The uploaded result will contain the file uploaded local path in the server, file’s name and length in bytes. You can add any other properties you want.
AngularJS Web client
It’s time to create a web client using AngularJS that will be able to upload multiple files using the controller we have just created. As we have mentioned we are going to use the AngularJS File Upload module which can be found here. Create a Scripts folder inside the API project and you need to add the following javascript files:
- angular.js
- angular-file-upload.js
- angular-route.js
- jquery-1.8.2.js (you can use any other version if you want)
Also add the bootstrap.css inside a Styles folder. Add a HomeController MVC Controller and add an Index() action if not exists. Create the respective View for this action and paste the following code:
Index.cshtml
@{
    Layout = null;
}

<!DOCTYPE html>

<html>
<head>
    <meta name="viewport" content="width=device-width" />
    <title>Index</title>
    <link href="~/Styles/bootstrap.css" rel="stylesheet" />
</head>
<body ng-app="angularUploadApp">
    <div class="container">
        <div class="jumbotron">
            <p>Web API File uploading using AngularJS client. Read more at <a href="http://chsakell.com/2015/06/07/web-api-file-uploading-desktop-and-web-client" target="_blank">chsakell.com/</a>.</p>
        </div>
        <div ng-include="'app/templates/fileUpload.html'"></div>

    </div>
    <script src="Scripts/jquery-1.8.2.js"></script>
    <script src="Scripts/angular.js"></script>
    <script src="Scripts/angular-file-upload.js"></script>
    <script src="Scripts/angular-route.js"></script>
    <script src="app/app.js"></script>
    <script src="app/controllers/fileUploadCtrl.js"></script>

</body>
</html>
We haven’t created either the angularJS fileUpload.html or the app.js and fileUploadCtrl.js yet, so let’s add them. You have to create the following folders first:
- app
- app/controllers
- app/templates
app/app.js
'use strict';

angular.module('angularUploadApp', [
    'ngRoute',
    'angularFileUpload'
])

.config(function ($routeProvider) {
    $routeProvider
    .when('/', {
        templateUrl: 'app/templates/fileUpload.html',
        controller: 'fileUploadCtrl'
    })
    .otherwise({
        redirectTo: '/'
    });
});
app/controllers/fileUploadCtrl.js
'use strict';

angular.module('angularUploadApp')
    .controller('fileUploadCtrl', function ($scope, $http, $timeout, $upload) {
        $scope.upload = [];
        $scope.UploadedFiles = [];

        $scope.startUploading = function ($files) {
            //$files: an array of files selected
            for (var i = 0; i < $files.length; i++) {
                var $file = $files[i];
                (function (index) {
                    $scope.upload[index] = $upload.upload({
                        url: "./api/fileupload", // webapi url
                        method: "POST",
                        file: $file
                    }).progress(function (evt) {
                    }).success(function (data, status, headers, config) {
                        // file is uploaded successfully
                        $scope.UploadedFiles.push({ FileName: data.FileName, FilePath: data.LocalFilePath, FileLength : data.FileLength });
                    }).error(function (data, status, headers, config) {
                        console.log(data);
                    });
                })(i);
            }
        }
    });
app/templates/fileUpload.html
<div class="row" ng-controller="fileUploadCtrl">
    <div class="col-xs-3">
        <div>
            <input type="file" ng-file-select="startUploading($files)" multiple>
        </div>
    </div>
    <div class="col-xs-9">
        <div class="panel panel-default" ng-repeat="uploadedFile in UploadedFiles track by $index">
            <div class="panel-heading">
                <strong>{{uploadedFile.FileName}}</strong>
            </div>
            <div class="panel-body">
                <div class=" media">
                    <a class="pull-left" href="#">
                        <img class="media-object" width="100" ng-src="../uploads/{{uploadedFile.FileName}}" />
                    </a>
                    <div class="media-body">
                        <div class="lead" style="font-size:14px;color: crimson;width:500px;word-wrap:break-word">{{uploadedFile.FilePath}}</div>
                    </div>
                </div>
            </div>
            <div class="panel-footer">
                File total bytes: <span style="color:black">{{uploadedFile.FileLength}}</span>
            </div>
        </div>
    </div>
</div>
Build and fire your application. Select multiple files to upload and ensure that all worked as expected.
For the Windows Form client you need to add a new Windows Form project named WebApiFileUpload.DesktopClient and add reference to the WebApiFileUpload.API project (just to access the FileUploadResult class). You also need to install the Microsoft.AspNet.WebApi.Client through the Nuget Packages. I have created a simple Form that allows the user to select multiple files and upload them through the API Controller we created. Let’s see the main method that does that.
Part of Form1.cs
try
                {
                    HttpClient httpClient = new HttpClient();
                    // Read the files
                    foreach (String file in openFileDialog1.FileNames)
                    {
                        var fileStream = File.Open(file, FileMode.Open);
                        var fileInfo = new FileInfo(file);
                        FileUploadResult uploadResult = null;
                        bool _fileUploaded = false;

                        var content = new MultipartFormDataContent();
                        content.Add(new StreamContent(fileStream), "\"file\"", string.Format("\"{0}\"", fileInfo.Name)
                        );

                        Task taskUpload = httpClient.PostAsync(uploadServiceBaseAddress, content).ContinueWith(task =>
                        {
                            if (task.Status == TaskStatus.RanToCompletion)
                            {
                                var response = task.Result;

                                if (response.IsSuccessStatusCode)
                                {
                                    uploadResult = response.Content.ReadAsAsync<FileUploadResult>().Result;
                                    if (uploadResult != null)
                                        _fileUploaded = true;

                                    // Read other header values if you want..
                                    foreach (var header in response.Content.Headers)
                                    {
                                        Debug.WriteLine("{0}: {1}", header.Key, string.Join(",", header.Value));
                                    }
                                }
                                else
                                {
                                    Debug.WriteLine("Status Code: {0} - {1}", response.StatusCode, response.ReasonPhrase);
                                    Debug.WriteLine("Response Body: {0}", response.Content.ReadAsStringAsync().Result);
                                }
                            }

                            fileStream.Dispose();
                        });

                        taskUpload.Wait();
                        if (_fileUploaded)
                            AddMessage(uploadResult.FileName + " with length " + uploadResult.FileLength
                                            + " has been uploaded at " + uploadResult.LocalFilePath);
                    }

                    httpClient.Dispose();
                }
                catch (Exception ex)
                {
                    AddMessage(ex.Message);
                }
Of course you need to run the API Project first before trying to upload files using the Desktop client.
That’s it, we are done! We saw how to upload multipart-form data files using Web API from both Web and Desktop clients. I hope you have enjoyed the post.
- You can download the project we built from here.
| Reference: | Web API File Uploading (Desktop and Web client) from our NCG partner Christos Sakellarios at the chsakell’s Blog blog. |