OpenGL and C# are two of my favourite technologies.
In this post I would like to give a small intro on how to develop games or other 3D accelerated applications using them together.
We will go over:
- how to create a window with an OpenGL context that we can render to;
- how to create vertex buffers, load shaders, and render vertices.
For the purpose of this post I will keep things as simple as possible. However, instead of writing a horribly hard-coded example, we will use proper object oriented design to abstract away a lot of the interface of OpenGL.
This will allow us to focus on the intended behaviour of our program, instead of getting lost in the OpenGL API.
I use the same approach for my own work with OpenGL, which has resulted in my comprehensive wrapper library amulware.Graphics, which is for example used in my game Roche Fusion.
The library is open source and can be found here. For the purpose of this post we will however start from scratch.
Further, I assume that you know the basics of C#, have a rough idea of how modern graphics pipelines work and what a shader is.
Why OpenGL?
Before we start, I would like to give a little context on why I like to use OpenGL.
The biggest argument I could make if I was trying to convince someone to use OpenGL is that it is the cross-platform graphics API. This may change over the next few years with the development of Vulkan, but for now OpenGL is used on Linux, Mac, mobile devices, as well as Windows.
The only real alternative, when working low-level, is to use Direct3D, the rendering API of Microsoft’s DirectX. However, DirectX is only supported on Windows, which seems to make the choice obvious.
While earlier versions of OpenGL are by now extremely outdated, the API was redesigned in 2008 for version 3.0. We will use none of the features deprecated and removed since then, and instead focus on OpenGL 3.0 and higher.
Support for those versions is rampant these days, with OpenGL 3.0 being available on AMD Radeon HD2xxx and higher, NVidia 8xxx and higher, and Intel integrated GPU’s since Sandy Bridge.
Virtually anything – barring very low-budget integrated chips – that can be bought today supports OpenGL 4.0 or higher.
Window Management
To be able to make use of OpenGL in C# at all, we need some sort of wrapper around the C interface of the API. While there are alternatives, the most popular choice is probably OpenTK, the Open Toolkit library.
The library provides a low level wrapper around OpenGL, allowing us to use all its features. It also includes a large amount of useful mathematical types, including vectors and matrices which are a key element in computer graphics.
Further, it includes cross-platform window management, allowing us to run the exact same code on any platform without having to worry much about creating windows and handling associated events.
In fact, the only thing we have to do to create both a window, and an OpenGL context to render with is create an instance of OpenTK’s GameWindow class, and call its Run() method.
To allow for our own behaviour, we will subclass the class. We will give some default parameters in our base constructor call to make sure the window and context are initialised correctly, and then call the Run() method in our programs static Main().
Basic OpenGL calls
To access any kind of OpenGL functionality, we will use OpenTK’s static GL class. There are several different versions of it, and which one you want to use depends on the platform you are targeting.
If, like us today, you are going for Windows/Mac/Linux then you should use the one in OpenTK.Graphics.OpenGL.
The most basic things we can do are:
- show the version of the context that we created using
GL.GetString(); - set the size of our viewport to the same size as our window in
GameWindow.OnResize()usingGL.Viewport()(you need to do this to see anything); - clear the screen before rendering our frame, and swapping the backbuffer afterwards using
GL.ClearColor(),GL.Clear(), andGameWindow.SwapBuffers().
Adding these things our class looks as follows.
sealed class GameWindow : OpenTK.GameWindow
{
public GameWindow()
// set window resolution, title, and default behaviour
:base(1280, 720, GraphicsMode.Default, "OpenTK Intro",
GameWindowFlags.Default, DisplayDevice.Default,
// ask for an OpenGL 3.0 forward compatible context
3, 0, GraphicsContextFlags.ForwardCompatible)
{
Console.WriteLine("gl version: " + GL.GetString(StringName.Version));
}
protected override void OnResize(EventArgs e)
{
GL.Viewport(0, 0, this.Width, this.Height);
}
protected override void OnLoad(EventArgs e)
{
// this is called when the window starts running
}
protected override void OnUpdateFrame(FrameEventArgs e)
{
// this is called every frame, put game logic here
}
protected override void OnRenderFrame(FrameEventArgs e)
{
GL.ClearColor(Color4.Purple);
GL.Clear(ClearBufferMask.ColorBufferBit | ClearBufferMask.DepthBufferBit);
this.SwapBuffers();
}
}
If you are familiar with OpenGL, you may notice that we are using virtually the same commands that one would use in a C++ or C application.
GL.GetString() instead of glGetString(), etc.
This pattern is true for almost the entire OpenGL API in OpenTK, making it not only easier to use when switching from pure OpenGL, but also allowing us to easily look up the documentation of any GL call online.
Vertex Buffer Object
The primary way of rendering anything in OpenGL is using vertices. The easiest way of handling vertices in C# is by creating custom structures for them.
For this example we will use a simple vertex with a position and a colour.
struct ColouredVertex
{
public const int Size = (3 + 4) * 4; // size of struct in bytes
private readonly Vector3 position;
private readonly Color4 color;
public ColouredVertex(Vector3 position, Color4 color)
{
this.position = position;
this.color = color;
}
}
To render our vertices, we will need a vertex buffer object (VBO). You can think of this as a piece of GPU memory that we can copy our vertices to, so that they can be rendered.
Below you can see a very simple implementation wrapping all the functionality we will need.
sealed class VertexBuffer<TVertex>
where TVertex : struct // vertices must be structs so we can copy them to GPU memory easily
{
private readonly int vertexSize;
private TVertex[] vertices = new TVertex[4];
private int count;
private readonly int handle;
public VertexBuffer(int vertexSize)
{
this.vertexSize = vertexSize;
// generate the actual Vertex Buffer Object
this.handle = GL.GenBuffer();
}
public void AddVertex(TVertex v)
{
// resize array if too small
if(this.count == this.vertices.Length)
Array.Resize(ref this.vertices, this.count * 2);
// add vertex
this.vertices[count] = v;
this.count++;
}
public void Bind()
{
// make this the active array buffer
GL.BindBuffer(BufferTarget.ArrayBuffer, this.handle);
}
public void BufferData()
{
// copy contained vertices to GPU memory
GL.BufferData(BufferTarget.ArrayBuffer, (IntPtr)(this.vertexSize * this.count),
this.vertices, BufferUsageHint.StreamDraw);
}
public void Draw()
{
// draw buffered vertices as triangles
GL.DrawArrays(PrimitiveType.Triangles, 0, this.count);
}
}
For reasons of brevity, I will not go into details for each of the used GL calls. Feel free however, to look up the documentation of the corresponding OpenGL function online, or ask questions in the comments, if anything is not clear.
To keep the code short, I am also completely ignoring the need for disposing OpenGL objects we are no longer using.
If you are interested in how to do so, you can take a look at how I implement the IDisposable interface in my library’s VertexBuffer.
Shaders
To render anything, we need shaders; little programs that we can run on the GPU to put our vertices onto the screen.
In our simple case we want to create a vertex shader to transform out vertices into screen space and prepare them for rasterization, and a fragment shader (also known as pixel shader, especially in Direct3D) to assign a colour to each of our rendered fragments. Fragments for us are the same as pixels, and we will drop the distinction for this post.
In OpenGL, we create these two shaders separately and then link them together into one shader program as follows:
sealed class Shader
{
private readonly int handle;
public int Handle { get { return this.handle; } }
public Shader(ShaderType type, string code)
{
// create shader object
this.handle = GL.CreateShader(type);
// set source and compile shader
GL.ShaderSource(this.handle, code);
GL.CompileShader(this.handle);
}
}
sealed class ShaderProgram
{
private readonly int handle;
public ShaderProgram(params Shader[] shaders)
{
// create program object
this.handle = GL.CreateProgram();
// assign all shaders
foreach (var shader in shaders)
GL.AttachShader(this.handle, shader.Handle);
// link program (effectively compiles it)
GL.LinkProgram(this.handle);
// detach shaders
foreach (var shader in shaders)
GL.DetachShader(this.handle, shader.Handle);
}
public void Use()
{
// activate this program to be used
GL.UseProgram(this.handle);
}
}
Shaders in OpenGL are written in the OpenGL Shading language (GLSL), which looks very much like C.
For this example we will use very simple shaders. Our vertex shader will transform the vertex position by multiplying it with a projection matrix which we will set below.
It will also pass on the colour of the vertex, which will then be used in the fragment shader to colour the pixel.
#version 130
// a projection transformation to apply to the vertex' position
uniform mat4 projectionMatrix;
// attributes of our vertex
in vec3 vPosition;
in vec4 vColor;
out vec4 fColor; // must match name in fragment shader
void main()
{
// gl_Position is a special variable of OpenGL that must be set
gl_Position = projectionMatrix * vec4(vPosition, 1.0);
fColor = vColor;
}
#version 130
in vec4 fColor; // must match name in vertex shader
out vec4 fragColor; // first out variable is automatically written to the screen
void main()
{
fragColor = fColor;
}
Vertex Attributes and Vertex Array Objects
In principle we are almost done. However, when we pass our array of vertices to OpenGL, we will do so as a block of bytes, and it will not know how to interpret the data correctly.
To give it that information, specifically, to let it know what attributes our vertices have, and how they are laid out in memory, we will use a vertex array object (VAO).
VAOs are very different from vertex buffers. Despite their name, they do not store vertices. Instead they store information about how to access an array of vertices, which is exactly what we want.
Setting up a VAO is done as follows:
sealed class VertexArray<TVertex>
where TVertex : struct
{
private readonly int handle;
public VertexArray(VertexBuffer<TVertex> vertexBuffer, ShaderProgram program,
params VertexAttribute[] attributes)
{
// create new vertex array object
GL.GenVertexArrays(1, out this.handle);
// bind the object so we can modify it
this.Bind();
// bind the vertex buffer object
vertexBuffer.Bind();
// set all attributes
foreach (var attribute in attributes)
attribute.Set(program);
// unbind objects to reset state
GL.BindVertexArray(0);
GL.BindBuffer(BufferTarget.ArrayBuffer, 0);
}
public void Bind()
{
// bind for usage (modification or rendering)
GL.BindVertexArray(this.handle);
}
}
And the VertexAttribute type used is a simple container like this:
sealed class VertexAttribute
{
private readonly string name;
private readonly int size;
private readonly VertexAttribPointerType type;
private readonly bool normalize;
private readonly int stride;
private readonly int offset;
public VertexAttribute(string name, int size, VertexAttribPointerType type,
int stride, int offset, bool normalize = false)
{
this.name = name;
this.size = size;
this.type = type;
this.stride = stride;
this.offset = offset;
this.normalize = normalize;
}
public void Set(ShaderProgram program)
{
// get location of attribute from shader program
int index = program.GetAttributeLocation(this.name);
// enable and set attribute
GL.EnableVertexAttribArray(index);
GL.VertexAttribPointer(index, this.size, this.type,
this.normalize, this.stride, this.offset);
}
}
For information on how to define vertex attributes, I refer to the documentation of glVertexAttribPointer.
As example, this is how the definition looks for our vertex:
new VertexAttribute("vPosition", 3, VertexAttribPointerType.Float, ColouredVertex.Size, 0),
new VertexAttribute("vColor", 4, VertexAttribPointerType.Float, ColouredVertex.Size, 12)
Defining this data – especially since a lot of it is redundant or can be inferred in most cases – can be largely abstracted and simplified (or even done completely automatically).
For an idea of how that can be achieved, feel free to check this helper class I wrote for my own library.
Shader Uniforms
Something else we have to do before we can put everything together is set the value of the projection matrix.
Parameters like matrices, textures, and other user defined values that remain constant for the execution of a shader are stored in uniforms, which can in fact be treated like constants within shader code.
To avoid unpredictable or nonsensical behaviour, they should always be set before rendering as follows:
sealed class Matrix4Uniform
{
private readonly string name;
private Matrix4 matrix;
public Matrix4 Matrix { get { return this.matrix; } set { this.matrix = value; } }
public Matrix4Uniform(string name)
{
this.name = name;
}
public void Set(ShaderProgram program)
{
// get uniform location
var i = program.GetUniformLocation(this.name);
// set uniform value
GL.UniformMatrix4(i, false, ref this.matrix);
}
}
Attribute and Uniform Locations
Both attributes and uniforms have to be assigned to locations, which are specified by an integer. These locations can be specified in the shader’s source itself.
They can however also be extracted by their name, which I consider a better solution since detecting a wrong attribute name is much easier than finding inconsistencies between location assignments in the shader and the C# source.
To access these locations is easy, and can be done by adding the following two methods to our shader program type:
public int GetAttributeLocation(string name)
{
// get the location of a vertex attribute
return GL.GetAttribLocation(this.handle, name);
}
public int GetUniformLocation(string name)
{
// get the location of a uniform variable
return GL.GetUniformLocation(this.handle, name);
}
Note that these GL calls return -1 if a location was not found, which you may want to check for in a production setting. Further, it may be advantageous to keep a local copy of all known locations for easier and faster access.
Finally: Triangles
With of all the above set up, we can finally put things together, and render our first triangle!
To recap, here are the steps we have to follow to put all of the above together.
When the program loads we:
- create a vertex buffer and put some vertices into it;
- load our shaders and link them into a shader program;
- create a vertex array to specify our vertices’ layout;
- create a matrix uniform for our projection matrix.
Since we abstracted a lot of functionality into the different types, we can do all of this in just a few lines of code. This is a good example of how abstraction helps think about a problem on a higher level to prevent getting caught up in the details.
With everything set up, we can now draw the vertices we created as follows:
- activate shader program and set uniforms;
- bind vertex buffer and array objects;
- upload vertices to GPU and draw them;
- reset state for potential further draw calls (optional, but good practice).
And the resulting image may look something like this:
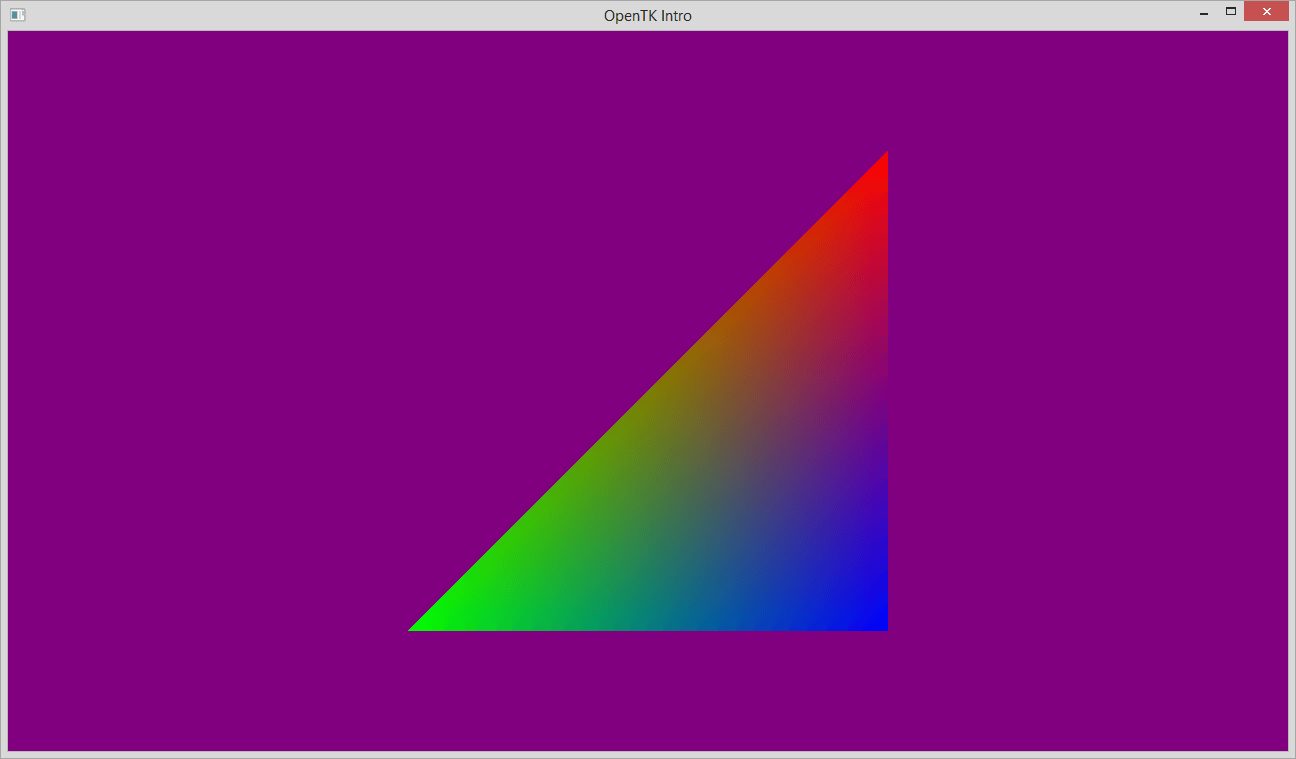
The code for both of these parts can found in the OnLoad() and OnRenderFrame() of the final game window.
In fact I put together all the source code above into a neat little stand-alone project which you can find on my GitHub page.
Feel free to take a look and do with the code as you will.
Conclusion
In this post we went from an empty game window to creating several types to make using OpenGL in C# much easier.
That allowed us to put together a simple example renderer drawing a colourful triangle using our own shaders.
I use virtually the same code as above, though with a lot more additional features and a few more layers of abstraction in my own graphics library which is also available on GhitHub.
The library is still heavily in development, and I am currently in the middle of refactoring large parts of it. However it already has a lot of features and is working well and fast enough to power the complex rendering pipeline of Roche Fusion.
I hope this post has been useful to you. Of course feel free to ask questions or comment below.
I would love to hear what you think, especially if this post may have convinced you to look into OpenGL in C# yourself.
There will also be more posts on OpenGL and computer graphics in general coming up in the future. These may include but are not limited to keyframe animations, GPU simulated particle systems, a variety of post processing techniques, and more!
If you have any particular topic you would like me to cover, Feel free to let me know, and I will prioritize those subjects.
For the time being,
Enjoy the pixels!
| Reference: | OpenGL in C# – an object oriented introduction to OpenTK from our NCG partner Paul Scharf at the GameDev<T> blog. |