This is the first part in a series of blog posts on Getting Visual Studio Code Ready for TypeSript:
Compiling TypeScript to JavaScript (this post)
Why TypeScript?
In case you’re new to TypeScript, Wikipedia defines TypeScript in the following way (paraphrased):
TypeScript is designed for development of large applications and transcompiles to JavaScript. It is a strict superset of JavaScript (any existing JavaScript programs are also valid TypeScript programs), and it adds optional static typing and class-based object-oriented programming to the JavaScript language.
Coming from a C# background, I was attracted to TypeScript, first because it is the brain child of Anders Hejlsberg, who also invented the C# programming language, and I can have confidence it has been well-designed, and second because I like to rely on the compiler to catch errors while I am writing code. While TypeScript embraces all the features of ECMAScript 2015, such as modules, classes, promises and arrow functions, it adds type annotations which allow code editors to provide syntax checking and intellisense, making it easier to use the good parts of JavaScript while avoiding the bad.
You can download the code for a sample VS Code TypeScript project from my Demo.VSCode.TypeScript repository on GitHub.
I also published a Yeoman generator called tonysneed-vscode-typescript, which provides scaffolding for a new TypeScript Library project with unit testing support from Jasmine, Karma and Gulp.
Why Visual Studio Code?
Once I decided to embark on the adventure of learning TypeScript, the next question was: What development tools should I use?
I’ve spent the better part of my career with Microsoft Visual Studio, and I enjoy all the bells and whistles it provides. But all those fancy designers come at a cost, both in terms of disk space and RAM, and even installing or updating VS 2015 can take quite a while. To illustrate, here is a joke I recently told a friend of mine:
I like Visual Studio because I can use it to justify to my company why I need to buy better hardware, so I can run VS and get acceptable performance. That’s how I ended up with a 1 TB SSD and 16 GB of RAM — thank you Visual Studio!
I also own a MacBook Air, mainly because of Apple’s superior hardware, and run a Windows 10 virtual machine so that I can use Visual Studio and Office. But I thought it would be nice to be able to write TypeScript directly on my Mac without having to spin up a Windows VM, which can drain my laptop’s battery. So I thought I would give Visual Studio Code a try.
But before I started with VS Code, I decided to go back to Visual Studio and create a simple TypeScript project with support for unit testing with Jasmine, which is a popular JavaScript unit testing framework. It turns out the experience was relatively painless, but I still had to do a lot of manual setup, which entailed creating a new TypeScript project in Visual Studio, deleting the files that were provided, installing NuGet packages for AspNet.Mvc and JasmineTest, then adding a bare-bones controller and a view which I adapted from the spec runner supplied by Jasmine.
You can download the code for a sample VS 2015 TypeScript project from my Demo.VS2015.TypeScript repository on GitHub.
Visual Studio 2015 still required me to do some work to create a basic TypeScript project with some unit tests, and if I wanted to add other features, such as linting my TypeScript or automatically refreshing the browser when I changed my code, then I would have to use npm or a task runner such as Grunt or Gulp. This helped tip the scales for me in favor of Visual Studio Code.
VS Code is actually positioned as something between a simple code editor, such as Atom, Brackets or SublimeText, and a full fledged IDE like Visual Studio or WebStorm. The main difference is that VS Code lacks a “File, New Project” command for creating a new type of project with all the necessary files. This means you either have to start from scratch or select a Yeoman generator to scaffold a new project.
I decided to start from scratch, because I like pain. (OK, I’m just kidding.)
The truth is, I couldn’t find an existing generator that met my needs, and I wanted to learn all I could from the experience of getting VS Code ready for TypeScript. The result was a sample project on GitHub (Demo.VSCode.TypeScript) and a Yeoman generator (tonysneed-vscode-typescript) for scaffolding new TypeScript projects.
[javascript highlight=”1-3,6,9″ padlinenumbers=”false”]
/**
* Compile TypeScript
*/
gulp.task(‘typescript-compile’, [‘vet:typescript’, ‘clean:generated’], function () { https://en.wikipedia.org/wiki/C_Sharp_(programming_language)
log(‘Compiling TypeScript’);
exec(‘node_modules/typescript/bin/tsc -p src’);
https://github.com/tonysneed/Demo.VS2015.TypeScript
[/javascript]
[xml highlight=”1-2,4″ padlinenumbers=”2″ tabsize=”2″]
| Reference: |
[/xml]
Here is the content of the ‘tsconfig.json’ file. Note that both ‘rootDir’ and ‘outDir’ must be set in order to preserve directory structure in the ‘dist’ folder.
{
    "compilerOptions": {
        "module": "commonjs",
        "target": "es5",
        "sourceMap": true,
        "declaration": true,
        "removeComments": true,
        "noImplicitAny": true,
        "rootDir": ".",
        "outDir": "../dist"
    },
    "exclude": [
        "node_modules"
    ]
}
Compiling TypeScript to JavaScript
My first goal was to compile TypeScript into JavaScript with sourcemaps for debugging and type definitions for intellisense. This turned out to be much more challenging than I thought it would be. I discovered that the gulp-typescript plugin did not handle relative paths very well, so instead I relied on npm (Node Package Manager) to invoke the TypeScript compiler directly, setting the project parameter to the ‘src’ directory in which I placed my tsconfig.json file. This allowed for specifying a ‘dist’ output directory and preserving the directory structure in ‘src’. To compile TypeScript using a gulp task, all I had to do was execute the ‘tsc’ script.
/**
 * Compile TypeScript
 */
gulp.task('typescript-compile', ['vet:typescript', 'clean:generated'], function () { https://en.wikipedia.org/wiki/C_Sharp_(programming_language)
	log('Compiling TypeScript');
    exec('node_modules/typescript/bin/tsc -p src');
https://github.com/tonysneed/Demo.VS2015.TypeScript
});
Here is the content of the ‘tsconfig.json’ file. Note that both ‘rootDir’ and ‘outDir’ must be set in order to preserve directory structure in the ‘dist’ folder.
{
    "compilerOptions": {
        "module": "commonjs",
        "target": "es5",
        "sourceMap": true,
        "declaration": true,
        "removeComments": true,
        "noImplicitAny": true,
        "rootDir": ".",
        "outDir": "../dist"
    },
    "exclude": [
        "node_modules"
    ]
}
Debugging TypeScript
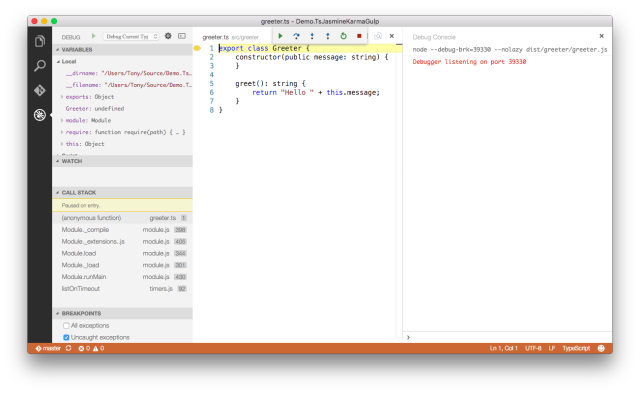
I could then enable debugging of TypeScript in Visual Studio Code by adding a ‘launch.json’ file to the ‘.vscode’ directory and including a configuration for debugging the currently selected TypeScript file.
{
    "name": "Debug Current TypeScript File",
    "type": "node",
    "request": "launch",
    // File currently being viewed
    "program": "${file}",
    "stopOnEntry": true,
    "args": [],
    "cwd": ".",
    "sourceMaps": true,
    "outDir": "dist"
}
Then I could simply open ‘greeter.ts’ and press F5 to launch the debugger and break on the first line.
Linting TypeScript
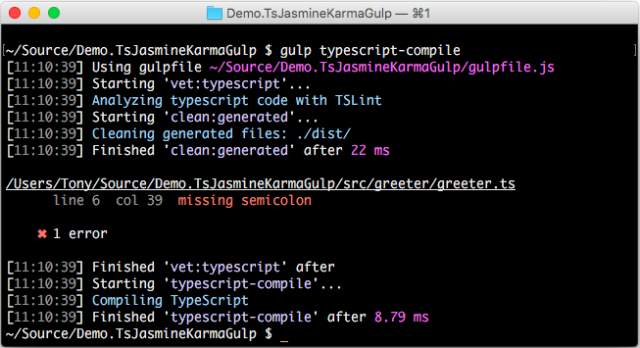
While compiling and debugging TypeScript was a good first step, I also wanted to be able to lint my code using tslint. So I added a gulp task called ‘vet:typescript’ and configured my ‘typescript-compile’ task to be dependent on it. The result was that, if I for example removed a semicolon from my Greeter class and compiled my project from the terminal, I would see a linting error displayed.
Configuring the Build Task
I also wanted to be able to compile TypeScript simply by pressing Cmd+B. That was easy because VS Code will use a Gulpfile if one is present. Simply specify ‘gulp’ for the command and ‘typescript-compile’ for the task name, then set ‘isBuildCommand’ to true.
{
    "version": "0.1.0",
    "command": "gulp",
    "isShellCommand": true,
    "args": [
        "--no-color"
    ],
    "tasks": [
        {
            "taskName": "typescript-compile",
            "isBuildCommand": true,
            "showOutput": "always",
            "problemMatcher": "$gulp-tsc"
        }
    ]
}
Adding a Watch Task
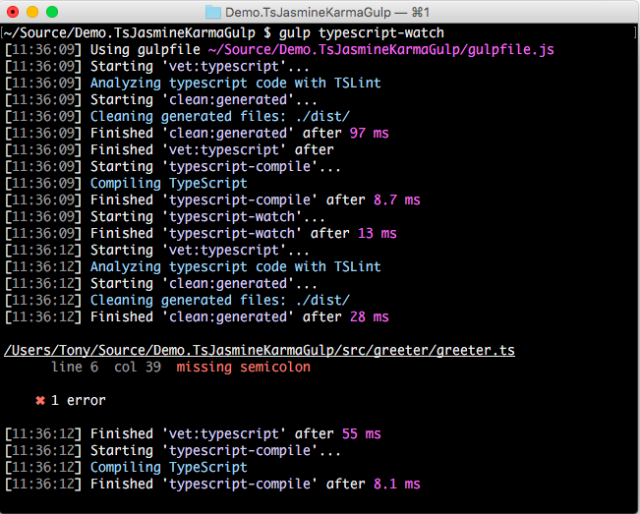
Lastly, I thought it would be cool to run a task that watches my TypeScript files for changes and automatically re-compiles them. So I added yet another gulp task, called ‘typescript-watch’, which first compiles the .ts files, then watches for changes.
/**
 * Watch and compile TypeScript
 */
gulp.task('typescript-watch', ['typescript-compile'], function () {
    return gulp.watch(config.ts.files, ['typescript-compile']);
});
I could then execute this task from the command line. Here you can see output shown in the terminal when a semicolon is removed from a .ts file.
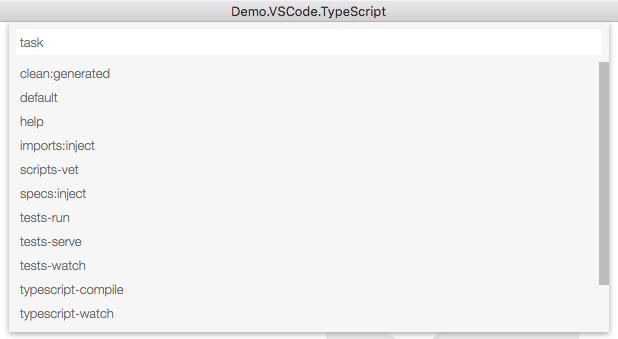
It is also possible to execute a gulp task from within VS Code. Press Cmd+P, type ‘task’ and hit the spacebar to see the available gulp tasks. You can select a task by typing part of the name, then press Enter to execute the task.
Using a Yeoman Generator
While it’s fun to set up a new TypeScript project with Visual Studio Code from scratch, an easier way is to scaffold a new project using a Yeoman generator, which is the equivalent of executing File, New Project in Visual Studio. That’s why I built a Yeoman generator called tonysneed-vscode-typescript, which gives you a ready-made TypeScript project with support for unit testing with Jasmine and Karma. (I’ll explain more about JavaScript testing frameworks in the next part of this series.)
![]()
To get started using Yeoman, you’ll need to install Yeoman with the Node Package Manager.
npm install -g yo
Next install the tonysneed-vscode-typescript Yeoman generator.
npm install -g generator-tonysneed-vscode-typescript
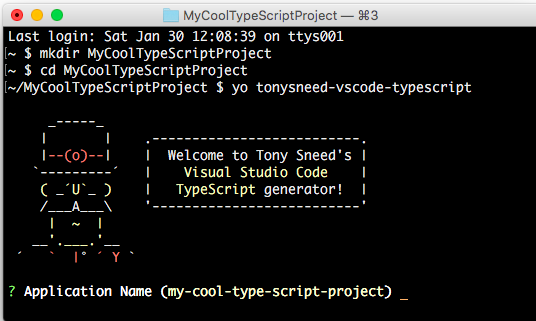
To use the generator you should first create the directory where you wish to place your scaffolded TypeScript project.
mkdir MyCoolTypeScriptProject
cd MyCoolTypeScriptProject
Then simply run the Yeoman generator.
yo tonysneed-vscode-typescript
To view optional arguments, you can append –help to the command. Another option is to skip installation of npm dependencies by supplying an argument of –skip-install, in which case you can install the dependencies later by executing npm install from the terminal.
In response to the prompt for Application Name, you can either press Enter to accept the default name, based on the current directory name, or enter a new application name.
Once the generator has scaffolded your project, you can open it in Visual Studio Code from the terminal.
code .
After opening the project in Visual Studio Code, you will see TypeScript files located in the src directory. You can compile the TypeScript files into JavaScript simply by pressing Cmd+B, at which point a dist folder should appear containing the transpiled JavaScript files.
For the next post in this series I will explain how you can add unit tests to your TypeScript project, and how you can configure test runners that can be run locally as well as incorporated into your build process for continuous integration.
| Reference: | Getting Visual Studio Code Ready for TypeScript from our NCG partner Tony Sneed at the Tony Sneed’s Blog blog. |

just tried installing the yeoman generator…
where to even begin….
long list of outdated modules, long list of warnings, gulp not installed, using outdated typescript lib in the settings for vscode
total waste of time